BC Robotics
Browse categories
- New Additions
- Shop
- On Sale / Clearance
- Popular Categories
- ArduinoArduino is the most popular open source microcontroller platform on the market. These easy to program devices can read sensors, control relays, light up LEDs, and even talk to one another. Their ability to interact with the real world by way of sensors and other electronics makes them ideal for automation such as watering a plant when it is dry, reading the weather, or controlling lights when it gets dark – the possibilities are endless. We carry a variety of Arduino compatible microcontrollers from several manufacturers, each with their own specific strengths and purposes. To further specialize your microcontroller, we carry a large selection of daughter boards (shields) which can add powerful sensors, GPS, or even LCD screens to your project! Just getting started with microcontrollers? We carry a variety of Arduino starter kits to get you reading sensors and blinking lights as easily as quickly as possible!
- BBC micro:bitThe BBC micro:bit is a pocket-sized computer designed for beginners in electronics and coding. The micro:bit makes getting into these often daunting fields as easy as possible. Programming the micro:bit V2 can be done by computer or by their intuitive app available for Android and iOS devices. Code can be designed using a drag and drop interface in the Blocks editor, Javascript, or Python.
- ESP8266 & ESP32The ESP8266 and ESP32 microcontrollers from Espressif are powerful, inexpensive, and feature integrated WiFi connectivity. These are ideal for IoT applications. We offer a variety of different ESP8266 and ESP32 modules for different skill levels.
- FeatherFeather is a flexible and powerful family of microcontroller main-boards (Feathers) and daughter-boards (Wings) designed with portability in mind. All Feathers have integrated battery connectors (and most have built in lipo chargers) The Feather form factor is not locked to a specific chipset or programming language. Feathers are available with a variety of chipsets and on-board features. Most Feathers and FeatherWings have example code and libraries written in Arduino C/C++ and CircuitPython.
- Makey MakeyThe Makey Makey kit is a electronics kit designed for beginners. It explores the concepts of creating circuits through everyday items. When plugged into a computer you can use the Makey Makey to make anything into a keyboard or mouse. No programming required! Projects like a Banana Drum Set, Cat Detector, Musical Stairs, and countless others are easier than you think! We carry the Makey Makey Classic Kit – a starter kit for the Makey Makey – along with extra alligator clips, copper conductive tape, and replacement cables.
- Raspberry PiThe Raspberry Pi was first introduced in early 2012 as a simple, low cost, computer fit onto a circuit board roughly the size of a credit card. The idea was to use this low cost computer to promote teaching of computer science in schools but it has grown to be so much more! Since its release, well over 30 million of these little computers have been sold. We have carried the Raspberry Pi in Canada since it first became available and have watched as the Pi has morphed into a complete development platform with powerful single-board computers, cameras, touchscreens, and other accessories. Its multitude of inputs and outputs for electronics and computer peripherals and its impressive computing power mean it can be used to make just about anything you can imagine. The newest and most powerful version, the Raspberry Pi 4, is now available!
- Popular Brands
- AdafruitAdafruit was founded in 2005 by MIT engineer, Limor “Ladyada” Fried. Her goal was to create the best place online for learning electronics and making the best designed products for makers of all ages and skill levels. In the last 10 years, Adafruit has grown to over 100+ employees in the heart of NYC with a 50,000+ sq ft. factory.
- ArduinoArduino is an ever growing platform used by some of the most popular microcontrollers out there. For many of us, this is where it all started – the Arduino was (and still is today) a pioneer when it comes to making programming hardware easy and accessible. We have one of the largest selections of Arduino and Arduino accessories in Canada. These range from basic Arduino Uno, to Cellular and WiFi connected devices perfect for the Internet of Things, and all the accessories needed to get them running!
- Micro:bitMicro:bit Educational Foundation are the manufacturers of the popular BBC micro:bit; a pocket-sized computer designed for beginners in electronics and coding. The micro:bit makes getting into these often daunting fields as easy as possible. Programming the micro:bit V2 can be done by computer or by their intuitive app available for Android and iOS devices. Code can be designed using a drag and drop interface in the Blocks editor, Javascript, or Python.
- BC RoboticsIn addition to stocking 2000+ unique items, we also manufacture our own accessories right here at BC Robotics. In 2014 we began developing our own widgets and add-ons for Arduino, Raspberry Pi, and general prototyping. This has now grown to over 80 different SKUs. Our boards are assembled in-house with top quality components. Many feature detailed tutorials or project guides to get you up and running as quickly as possible!
- Raspberry Pi
- SparkFunSince 2003, SparkFun has been helping turn ideas into reality – whether you’re creating a smart weather station, exploring the frontier of machine learning, building a robot for school or prototyping your first (or tenth) product. No matter your vision or skill level, our open source components, resources and online tutorials are designed to broaden access to innovative technology and make the road to a finished project shorter. We’re here to help you start something.
- Frequently Asked Questions
- My Account
- Wishlist
- Cart
Free Shipping - US & Canada @ $150 CAD
Raspberry Pi Pico Weather Station – Part 2 (Arduino)
PRODUCT TUTORIAL
- Chris @ BCR
- February 7, 2023
- 10:47 pm
- 5 Comments
In Part 1 of this tutorial we attached the Pico to the Weather Board and looked at all of the sensors. If you have not yet completed this part of the tutorial, please complete this before proceeding further.
Part 2 of this tutorial is split into two versions. We will be walking through this in both Arduino and MicroPython with step by step example code. This is not claimed to be the best possible way of doing this, and we encourage anyone interested to further the code and improve the accuracy. Our goal here is to make this as easy to follow as possible. This specific version of the tutorial is for Arduino and our MicroPython version will be following shortly.

Arduino Installation and Configuration
If you have not already installed the Arduino IDE and installed the Raspberry Pi Pico library, we have created a tutorial specifically covering this. Jump over to our Programming the Raspberry Pi Pico with Arduino tutorial and complete it before proceeding.
Arduino Libraries
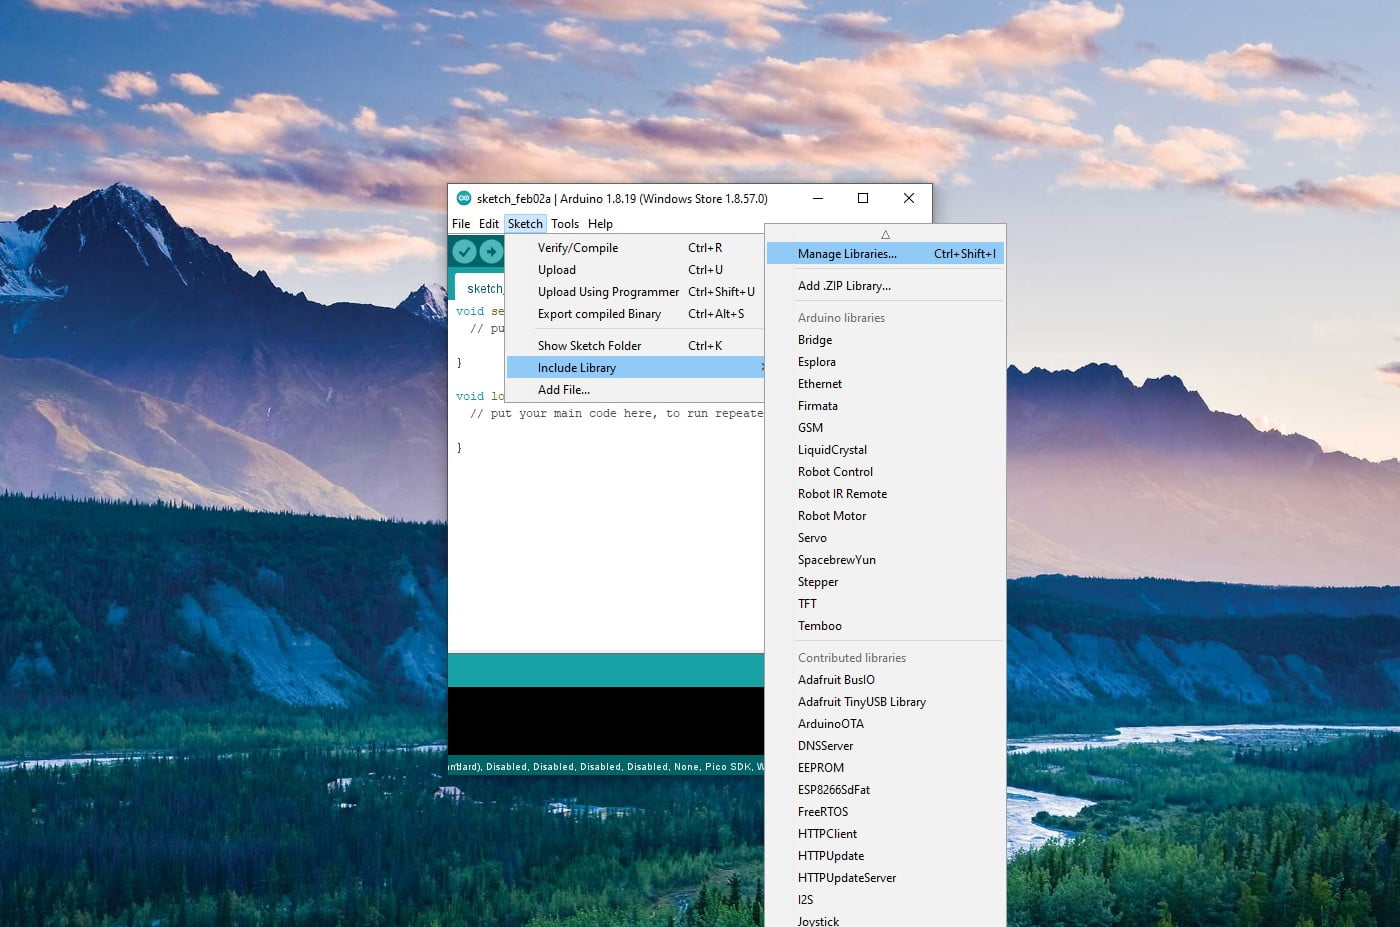
Before we get too carried away writing code, we will first need to install a few libraries to simplify reading several of the sensors. These libraries can all be added using the Arduino IDE’s internal library manager.
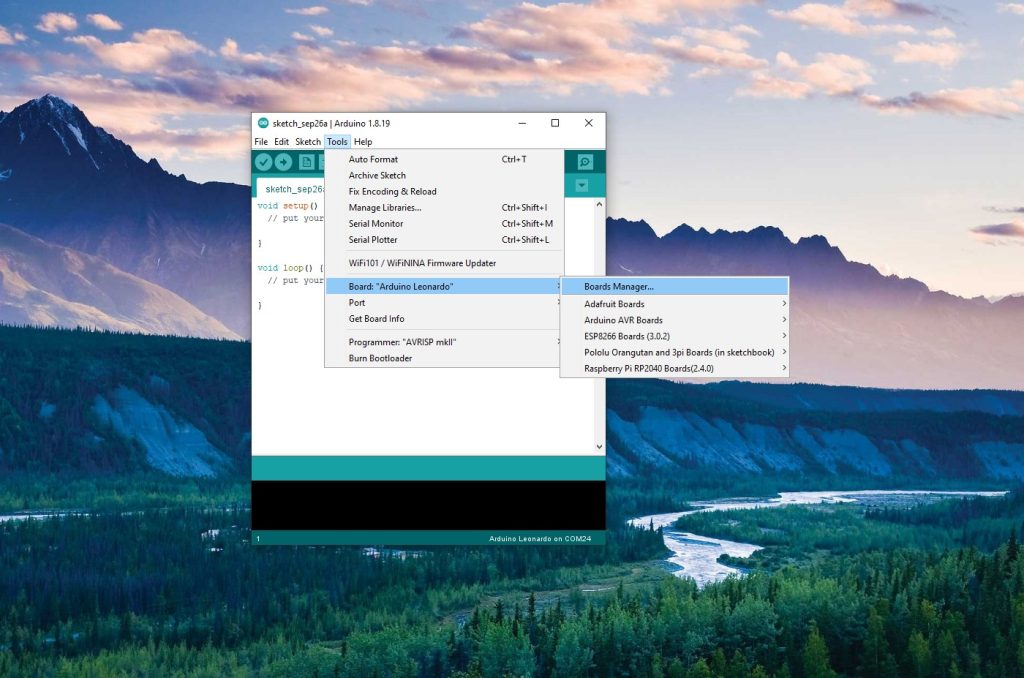
With the Arduino IDE open, click “Sketch” in the upper toolbar, and go to “Include Library” and select “Manage Libraries”. This dialogue allows you to add / remove / update libraries directly in the IDE. If you are unfamiliar with adding libraries to Arduino, Adafruit has an excellent tutorial on that!
Install the following libraries:
- microDS18B20
- Adafruit Unified Sensor
- Adafruit BME280 Library
Step 1 - Starting The Code
Time to start writing some code! We are going to break this down into a step by step process focusing on each individual sensor. From there we will write additional code to convert the sensor inputs to meaningful data where needed. Finally, we will collate it and print all of the values out via the Serial Monitor so we can confirm everything is working correctly.
Start a new project in the Arduino IDE. This should give you the BareMinimum Sketch found in the IDE, it should look something like this:
					void setup() {
// put your setup code here, to run once:
}
void loop() {
// put your main code here, to run repeatedly:
}
9%
Step 2 - Output Values
Start by creating the following variables. These are going to be used to store all of our cleaned-up output data for each sensor. We will be measuring:
- Temperature using the DS18B20
- Humidity / Barometric Pressure / Case Temperature using the BME280
- Wind Speed, Wind Direction, and Rainfall all using the Weather Meters.
					//Calculated Values
double temperature;
double humidity;
double pressure;
double caseTemperature;
double measuredWind;
String windHeading;
double rainfall;

void setup() {
  // put your setup code here, to run once:

}

void loop() {
  // put your main code here, to run repeatedly:

}
Next, we are going to configure our serial port in the Setup portion of our code. This will allow us to write data to the serial monitor later on.
					//Calculated Values
double temperature;
double humidity;
double pressure;
double caseTemperature;
double measuredWind;
String windHeading;
double rainfall;

void setup() {
  // put your setup code here, to run once:
  Serial.begin(115200); //Connect to Serial
  while (!Serial);      //Pause code while we wait for Serial to connect
}

void loop() {
  // put your main code here, to run repeatedly:

}
Finally, we are going to create a new function to handle all of our data collection. A function is an easy way to keep certain tasks grouped together and will hopefully keep this code easier to understand once we add everything in. Head to the bottom of your program and add the new function like this:
					//Calculated Values
double temperature;
double humidity;
double pressure;
double caseTemperature;
double measuredWind;
String windHeading;
double rainfall;

void setup() {
  // put your setup code here, to run once:
  Serial.begin(115200); //Connect to Serial
  while (!Serial);      //Pause code while we wait for Serial to connect
}

void loop() {
  // put your main code here, to run repeatedly:

}

//Function to collect all of our data
void collectData() {

}
18%
Step 3 - DS18B20
With the microDS18B20 library installed earlier, we can now implement it into our code. At the very top of our program we are going to add in a line to tell the compiler to include the microDS18B20 library.
					#include <microDS18B20.h>

//Calculated Values
double temperature;
double humidity;
double pressure;
double caseTemperature;
double measuredWind;
String windHeading;
double rainfall;

void setup() {
  // put your setup code here, to run once:
  Serial.begin(115200); //Connect to Serial
  while (!Serial);      //Pause code while we wait for Serial to connect
}

void loop() {
  // put your main code here, to run repeatedly:

}

//Function to collect all of our data
void collectData() {

}
Next we are going to create our DS18B20 sensor and assign it to pin 2. We are choosing pin 2 as the Raspberry Pi Pico Weather Board connects the DS18B20 header to pin 2.
Below our variables for our calculated values, add the highlighted code:
					#include <microDS18B20.h>

//Calculated Values
double temperature;
double humidity;
double pressure;
double caseTemperature;
double measuredWind;
String windHeading;
double rainfall;

//DS18B20
MicroDS18B20<2> ds;

void setup() {
  // put your setup code here, to run once:
  Serial.begin(115200); //Connect to Serial
  while (!Serial);      //Pause code while we wait for Serial to connect
}

void loop() {
  // put your main code here, to run repeatedly:

}

//Function to collect all of our data
void collectData() {

}
Next, we are going to add the code to read the DS18B20 in our collectData function. To collect data from the DS18B20, we first need to ping it with a temperature request and wait for a reply. The sensor can take a little time to respond, so we will need to wait 1 full second for a response. If the sensor returns data we will pass it directly to our temperature variable as the library provides the temperature in Celsius – no conversions required. If no response is received, an error message will be posted. Add the following code:
					#include <microDS18B20.h>

//Calculated Values
double temperature;
double humidity;
double pressure;
double caseTemperature;
double measuredWind;
String windHeading;
double rainfall;

//DS18B20
MicroDS18B20<2> ds;

void setup() {
  // put your setup code here, to run once:
  Serial.begin(115200); //Connect to Serial
  while (!Serial);      //Pause code while we wait for Serial to connect
}

void loop() {
  // put your main code here, to run repeatedly:

}

//Function to collect all of our data
void collectData() {

  //DS18B20 Temperature
  ds.requestTemp();   //Request temperature from the sensor
  delay(1000);        //Wait 1 second for a response

  //If the sensor retrives data, write it to our temperature variable. Otherwise, return an error message
  if (ds.readTemp())  {
    temperature = ds.getTemp();
  }
  else {
    //Sensor not connected
    Serial.println("DS18B20 Not Connected");
  }
}
28%
Step 4 - BME280
The BME280 provides a good portion of our data, so lets get that one set up next! This sensor requires three libraries to function so let’s add those first:
					#include <microDS18B20.h>
#include <Adafruit_Sensor.h>
#include <Adafruit_BME280.h>
#include <Wire.h>

//Calculated Values
double temperature;
double humidity;
double pressure;
double caseTemperature;
double measuredWind;
String windHeading;
double rainfall;

//DS18B20
MicroDS18B20<2> ds;

void setup() {
  // put your setup code here, to run once:
  Serial.begin(115200); //Connect to Serial
  while (!Serial);      //Pause code while we wait for Serial to connect
}

void loop() {
  // put your main code here, to run repeatedly:

}

//Function to collect all of our data
void collectData() {

  //DS18B20 Temperature
  ds.requestTemp();   //Request temperature from the sensor
  delay(1000);        //Wait 1 second for a response

  //If the sensor retrives data, write it to our temperature variable. Otherwise, return an error message
  if (ds.readTemp())  {
    temperature = ds.getTemp();
  }
  else {
    //Sensor not connected
    Serial.println("DS18B20 Not Connected");
  }
}
Next we are getting into a bit of a weird spot. Due to the Pico’s ability to assign its I2C ports to several different sets of pins there is a conflict with how this is normally addressed in the Adafruit Libraries. The solution is to use the Wire library to force I2C to pins 16 and 17.
We will step through this carefully as this is a little more involved. Start by creating an unsigned variable “status” and add the BME sensor.
					#include <microDS18B20.h>
#include <Adafruit_Sensor.h>
#include <Adafruit_BME280.h>
#include <Wire.h>

//Calculated Values
double temperature;
double humidity;
double pressure;
double caseTemperature;
double measuredWind;
String windHeading;
double rainfall;

//DS18B20
MicroDS18B20<2> ds;

//BME280
unsigned status;
Adafruit_BME280 bme;

void setup() {
  // put your setup code here, to run once:
  Serial.begin(115200); //Connect to Serial
  while (!Serial);      //Pause code while we wait for Serial to connect
}

void loop() {
  // put your main code here, to run repeatedly:

}

//Function to collect all of our data
void collectData() {

  //DS18B20 Temperature
  ds.requestTemp();   //Request temperature from the sensor
  delay(1000);        //Wait 1 second for a response

  //If the sensor retrives data, write it to our temperature variable. Otherwise, return an error message
  if (ds.readTemp())  {
    temperature = ds.getTemp();
  }
  else {
    //Sensor not connected
    Serial.println("DS18B20 Not Connected");
  }
}
Next, we are going to configure the BME280 to use pin 16 as SDA and pin 17 as SCL. From there we will update the BME and check it is connected properly. If not, an error code will be returned via serial letting us know.
					#include <microDS18B20.h>
#include <Adafruit_Sensor.h>
#include <Adafruit_BME280.h>
#include <Wire.h>

//Calculated Values
double temperature;
double humidity;
double pressure;
double caseTemperature;
double measuredWind;
String windHeading;
double rainfall;

//DS18B20
MicroDS18B20<2> ds;

//BME280
unsigned status;
Adafruit_BME280 bme;

void setup() {
  // put your setup code here, to run once:
  Serial.begin(115200); //Connect to Serial
  while (!Serial);      //Pause code while we wait for Serial to connect

  //Configure the BME
  Wire.setSDA(16);
  Wire.setSCL(17);

  status = bme.begin(0x77, &Wire);
  if (!status) {
    Serial.println("Could not find a valid BME280 sensor, check wiring, address, sensor ID!");
    while (1) delay(10);
  }
}

void loop() {
  // put your main code here, to run repeatedly:

}

//Function to collect all of our data
void collectData() {

  //DS18B20 Temperature
  ds.requestTemp();   //Request temperature from the sensor
  delay(1000);        //Wait 1 second for a response

  //If the sensor retrives data, write it to our temperature variable. Otherwise, return an error message
  if (ds.readTemp())  {
    temperature = ds.getTemp();
  }
  else {
    //Sensor not connected
    Serial.println("DS18B20 Not Connected");
  }
}
Finally, we are going to scroll down to our collectData function and add read our BME280 sensor. The Adafruit BME280 library outputs data in a very user-friendly method so we don’t really need to do much.
- Humidity is provided in the form of Percentage Relative Humidity – exactly what we need.
- Barometric Pressure is provided in the form of pascals; to get our desired output of kPa we will need to divide it by 1000 before assigning it to our output variable.
- Temperature is also provided by this sensor. This temperature reading is not going to be an accurate representation of the outdoor temperature, but we will record it anyways. It can be used to help calibrate the humidity sensor (we will go into why this is and how to use it later).
					#include <microDS18B20.h>
#include <Adafruit_Sensor.h>
#include <Adafruit_BME280.h>
#include <Wire.h>

//Calculated Values
double temperature;
double humidity;
double pressure;
double caseTemperature;
double measuredWind;
String windHeading;
double rainfall;

//DS18B20
MicroDS18B20<2> ds;

//BME280
unsigned status;
Adafruit_BME280 bme;

void setup() {
  // put your setup code here, to run once:
  Serial.begin(115200); //Connect to Serial
  while (!Serial);      //Pause code while we wait for Serial to connect

  //Configure the BME
  Wire.setSDA(16);
  Wire.setSCL(17);

  status = bme.begin(0x77, &Wire);
  if (!status) {
    Serial.println("Could not find a valid BME280 sensor, check wiring, address, sensor ID!");
    while (1) delay(10);
  }
}

void loop() {
  // put your main code here, to run repeatedly:

}

//Function to collect all of our data
void collectData() {

  //DS18B20 Temperature
  ds.requestTemp();   //Request temperature from the sensor
  delay(1000);        //Wait 1 second for a response

  //If the sensor retrives data, write it to our temperature variable. Otherwise, return an error message
  if (ds.readTemp())  {
    temperature = ds.getTemp();
  }
  else {
    //Sensor not connected
    Serial.println("DS18B20 Not Connected");
  }

  //BME280
  humidity = bme.readHumidity();
  pressure = bme.readPressure() / 1000; //Convert to kPa by dividing the result by 1000.
  caseTemperature = bme.readTemperature();
}
37%
Step 5 - Using Both Cores
Measuring rain and wind parameters is a bit more timing specific. We don’t want to miss any data. There are a number of different ways to do this, but since the Raspberry Pi Pico has two cores – why not use both! Think of this as the ability to have two programs running at the same time. We can assign all of this time sensitive stuff to the second core and not need to worry about it. While it sounds very complicated, for a basic task like this it is actually quite straight forward in Arduino.
We will start by creating our setup and loop for the second core. Add setup1() and loop1(). Anything in these two sections is executed by the second core.
					#include <microDS18B20.h>
#include <Adafruit_Sensor.h>
#include <Adafruit_BME280.h>
#include <Wire.h>

//Calculated Values
double temperature;
double humidity;
double pressure;
double caseTemperature;
double measuredWind;
String windHeading;
double rainfall;

//DS18B20
MicroDS18B20<2> ds;

//BME280
unsigned status;
Adafruit_BME280 bme;

void setup() {
  // put your setup code here, to run once:
  Serial.begin(115200); //Connect to Serial
  while (!Serial);      //Pause code while we wait for Serial to connect

  //Configure the BME
  Wire.setSDA(16);
  Wire.setSCL(17);

  status = bme.begin(0x77, &Wire);
  if (!status) {
    Serial.println("Could not find a valid BME280 sensor, check wiring, address, sensor ID!");
    while (1) delay(10);
  }
}

void loop() {
  // put your main code here, to run repeatedly:

}

void setup1() {
  // setup your code here for the second core
}

void loop1() {
  //put your main code here, to run repeatedly on the second core:
}


//Function to collect all of our data
void collectData() {

  //DS18B20 Temperature
  ds.requestTemp();   //Request temperature from the sensor
  delay(1000);        //Wait 1 second for a response

  //If the sensor retrives data, write it to our temperature variable. Otherwise, return an error message
  if (ds.readTemp())  {
    temperature = ds.getTemp();
  }
  else {
    //Sensor not connected
    Serial.println("DS18B20 Not Connected");
  }

  //BME280
  humidity = bme.readHumidity();
  pressure = bme.readPressure() / 1000; //Convert to kPa by dividing the result by 1000.
  caseTemperature = bme.readTemperature();
}
Since we are using two cores and data is split between the two of them we will need to ensure we stop the process of manipulating the data with the second core while we read it from the first one. We will use a flag to allow the first core to tell the second core “Hold on a second, stop counting”. Once we have grabbed the total, the first core will reset that counted value and tell core two that it can start counting again.
Create a “readData” flag – when it is is true, core two will not execute its code. Declare the variable just below the DS18B20 and BME280 at the top of the program:
					#include <microDS18B20.h>
#include <Adafruit_Sensor.h>
#include <Adafruit_BME280.h>
#include <Wire.h>

//Calculated Values
double temperature;
double humidity;
double pressure;
double caseTemperature;
double measuredWind;
String windHeading;
double rainfall;

//DS18B20
MicroDS18B20<2> ds;

//BME280
unsigned status;
Adafruit_BME280 bme;

//Multicore Flag
boolean readData = false;

void setup() {
  // put your setup code here, to run once:
  Serial.begin(115200); //Connect to Serial
  while (!Serial);      //Pause code while we wait for Serial to connect

  //Configure the BME
  Wire.setSDA(16);
  Wire.setSCL(17);

  status = bme.begin(0x77, &Wire);
  if (!status) {
    Serial.println("Could not find a valid BME280 sensor, check wiring, address, sensor ID!");
    while (1) delay(10);
  }
}

void loop() {
  // put your main code here, to run repeatedly:

}

void setup1() {
  // setup your code here for the second core
}

void loop1() {
  //put your main code here, to run repeatedly on the second core:
}


//Function to collect all of our data
void collectData() {

  //DS18B20 Temperature
  ds.requestTemp();   //Request temperature from the sensor
  delay(1000);        //Wait 1 second for a response

  //If the sensor retrives data, write it to our temperature variable. Otherwise, return an error message
  if (ds.readTemp())  {
    temperature = ds.getTemp();
  }
  else {
    //Sensor not connected
    Serial.println("DS18B20 Not Connected");
  }

  //BME280
  humidity = bme.readHumidity();
  pressure = bme.readPressure() / 1000; //Convert to kPa by dividing the result by 1000.
  caseTemperature = bme.readTemperature();
}
Next, add the conditional statement to your second core ( loop1 ). If readData equals False, it will run all code within. So to stop that process, all we do is set readData to True and nothing within those curly braces will be run.
					#include <microDS18B20.h>
#include <Adafruit_Sensor.h>
#include <Adafruit_BME280.h>
#include <Wire.h>

//Calculated Values
double temperature;
double humidity;
double pressure;
double caseTemperature;
double measuredWind;
String windHeading;
double rainfall;

//DS18B20
MicroDS18B20<2> ds;

//BME280
unsigned status;
Adafruit_BME280 bme;

//Multicore Flag
boolean readData = false;

void setup() {
  // put your setup code here, to run once:
  Serial.begin(115200); //Connect to Serial
  while (!Serial);      //Pause code while we wait for Serial to connect

  //Configure the BME
  Wire.setSDA(16);
  Wire.setSCL(17);

  status = bme.begin(0x77, &Wire);
  if (!status) {
    Serial.println("Could not find a valid BME280 sensor, check wiring, address, sensor ID!");
    while (1) delay(10);
  }
}

void loop() {
  // put your main code here, to run repeatedly:

}

void setup1() {
  // setup your code here for the second core
}

void loop1() {
  //put your main code here, to run repeatedly on the second core:
  if (readData == false) {

  }
  else{}
}


//Function to collect all of our data
void collectData() {

  //DS18B20 Temperature
  ds.requestTemp();   //Request temperature from the sensor
  delay(1000);        //Wait 1 second for a response

  //If the sensor retrives data, write it to our temperature variable. Otherwise, return an error message
  if (ds.readTemp())  {
    temperature = ds.getTemp();
  }
  else {
    //Sensor not connected
    Serial.println("DS18B20 Not Connected");
  }

  //BME280
  humidity = bme.readHumidity();
  pressure = bme.readPressure() / 1000; //Convert to kPa by dividing the result by 1000.
  caseTemperature = bme.readTemperature();
}
46%
Step 6 - The Rain Gauge
The rain gauge’s magnet passing by a reed switch provides a change in a digital signal. Our code is likely going to read that sensor multiple times as the magnet is passing so we will need to ensure we count this occurrence only once per time the magnet passes the sensor. We are going to do this with a “flag”. On the first read of the sensor, a flag will be set to true. This flag will stay true until the sensor changes again after the magnet passes.
We will also need a second variable to count the number of times this happens during our period of measure. Declare the two variables just below the DS18B20, BME280, and readData flag at the top of the program:
Syntax Note:
The number "0" and "LOW" both equal the same value. The same is true for "1" and "HIGH". These values can be interchanged as the compiler sees each of them exactly the same. Alternatively you could declare your variable as:
rainFlag = HIGH;
rainFlag = HIGH;
					#include <microDS18B20.h>
#include <Adafruit_Sensor.h>
#include <Adafruit_BME280.h>
#include <Wire.h>

//Calculated Values
double temperature;
double humidity;
double pressure;
double caseTemperature;
double measuredWind;
String windHeading;
double rainfall;

//DS18B20
MicroDS18B20<2> ds;

//BME280
unsigned status;
Adafruit_BME280 bme;

//Multicore Flag
boolean readData = false;

//Rain Gauge
int rainFlag = 1;
int rainCount = 0;

void setup() {
  // put your setup code here, to run once:
  Serial.begin(115200); //Connect to Serial
  while (!Serial);      //Pause code while we wait for Serial to connect

  //Configure the BME
  Wire.setSDA(16);
  Wire.setSCL(17);

  status = bme.begin(0x77, &Wire);
  if (!status) {
    Serial.println("Could not find a valid BME280 sensor, check wiring, address, sensor ID!");
    while (1) delay(10);
  }
}

void loop() {
  // put your main code here, to run repeatedly:

}

void setup1() {
  // setup your code here for the second core
}

void loop1() {
  //put your main code here, to run repeatedly on the second core:
  if (readData == false) {

  }
  else{}
}


//Function to collect all of our data
void collectData() {

  //DS18B20 Temperature
  ds.requestTemp();   //Request temperature from the sensor
  delay(1000);        //Wait 1 second for a response

  //If the sensor retrives data, write it to our temperature variable. Otherwise, return an error message
  if (ds.readTemp())  {
    temperature = ds.getTemp();
  }
  else {
    //Sensor not connected
    Serial.println("DS18B20 Not Connected");
  }

  //BME280
  humidity = bme.readHumidity();
  pressure = bme.readPressure() / 1000; //Convert to kPa by dividing the result by 1000.
  caseTemperature = bme.readTemperature();
}
Next, we will configure the Rain Gauge input. We need to set pin 3 to an input and set the pullup resistor. We will also set our flag to match the input. This will all be done in the second core’s setup (setup1).
					#include <microDS18B20.h>
#include <Adafruit_Sensor.h>
#include <Adafruit_BME280.h>
#include <Wire.h>

//Calculated Values
double temperature;
double humidity;
double pressure;
double caseTemperature;
double measuredWind;
String windHeading;
double rainfall;

//DS18B20
MicroDS18B20<2> ds;

//BME280
unsigned status;
Adafruit_BME280 bme;

//Multicore Flag
boolean readData = false;

//Rain Gauge
int rainFlag = 1;
int rainCount = 0;

void setup() {
  // put your setup code here, to run once:
  Serial.begin(115200); //Connect to Serial
  while (!Serial);      //Pause code while we wait for Serial to connect

  //Configure the BME
  Wire.setSDA(16);
  Wire.setSCL(17);

  status = bme.begin(0x77, &Wire);
  if (!status) {
    Serial.println("Could not find a valid BME280 sensor, check wiring, address, sensor ID!");
    while (1) delay(10);
  }
}

void loop() {
  // put your main code here, to run repeatedly:

}

void setup1() {
  // setup your code here for the second core
  pinMode(3, INPUT_PULLUP); //Rain
  rainFlag = digitalRead(3);
}

void loop1() {
  //put your main code here, to run repeatedly on the second core:
  if (readData == false) {

  }
  else{}
}


//Function to collect all of our data
void collectData() {

  //DS18B20 Temperature
  ds.requestTemp();   //Request temperature from the sensor
  delay(1000);        //Wait 1 second for a response

  //If the sensor retrives data, write it to our temperature variable. Otherwise, return an error message
  if (ds.readTemp())  {
    temperature = ds.getTemp();
  }
  else {
    //Sensor not connected
    Serial.println("DS18B20 Not Connected");
  }

  //BME280
  humidity = bme.readHumidity();
  pressure = bme.readPressure() / 1000; //Convert to kPa by dividing the result by 1000.
  caseTemperature = bme.readTemperature();
}
Finally, we need the code to read the sensor itself. This will go into the second core’s loop (loop1) and inside the conditional readData statement since we only want this to run when the first core is not trying to collect it.
This code itself is designed to get the input value for pin 3 and compare it to our flag. There are four possible cases that can happen here:
- Both the flag and the sensor are in a normal state (Sensor: HIGH, Flag: HIGH)
- The sensor has just been triggered, but the flag has not been set (Sensor: LOW, Flag: HIGH)
- The sensor is still in the process of emptying, but has not finished (Sensor: LOW, Flag: LOW)
- The sensor has finished emptying, but the flag has not been set (Sensor: HIGH, Flag: LOW)
Because we only want to count an emptying event once, we will want to focus on one of the transit states (second or fourth in the list) as they will each happen only once when the rain gauge empties. In this case we will use the falling transit (second in the list).
To do this, we will look at our input and watch for a situation where the sensor is LOW and the flag is still set to HIGH. Once this happens, we will increment our count by 1.
Outside of this loop, we will set the flag to match the input regardless of what happens.
					#include <microDS18B20.h>
#include <Adafruit_Sensor.h>
#include <Adafruit_BME280.h>
#include <Wire.h>

//Calculated Values
double temperature;
double humidity;
double pressure;
double caseTemperature;
double measuredWind;
String windHeading;
double rainfall;

//DS18B20
MicroDS18B20<2> ds;

//BME280
unsigned status;
Adafruit_BME280 bme;

//Multicore Flag
boolean readData = false;

//Rain Gauge
int rainFlag = 1;
int rainCount = 0;

void setup() {
  // put your setup code here, to run once:
  Serial.begin(115200); //Connect to Serial
  while (!Serial);      //Pause code while we wait for Serial to connect

  //Configure the BME
  Wire.setSDA(16);
  Wire.setSCL(17);

  status = bme.begin(0x77, &Wire);
  if (!status) {
    Serial.println("Could not find a valid BME280 sensor, check wiring, address, sensor ID!");
    while (1) delay(10);
  }
}

void loop() {
  // put your main code here, to run repeatedly:

}

void setup1() {
  // setup your code here for the second core
  pinMode(3, INPUT_PULLUP); //Rain
  rainFlag = digitalRead(3);
}

void loop1() {
  //put your main code here, to run repeatedly on the second core:
  if (readData == false) {

    //Rain Gauge
    int rainInput = digitalRead(3);   //Read the rain sensor input
    if (rainInput == LOW && rainFlag == HIGH) //Compare to our flag
    {
      rainCount++;  //The sensor has transited low, increase our count by 1
    }
    else {} //Otherwise dont do anything

    rainFlag = rainInput;    //Set our flag to match our input
  }
  else{}
}


//Function to collect all of our data
void collectData() {

  //DS18B20 Temperature
  ds.requestTemp();   //Request temperature from the sensor
  delay(1000);        //Wait 1 second for a response

  //If the sensor retrives data, write it to our temperature variable. Otherwise, return an error message
  if (ds.readTemp())  {
    temperature = ds.getTemp();
  }
  else {
    //Sensor not connected
    Serial.println("DS18B20 Not Connected");
  }

  //BME280
  humidity = bme.readHumidity();
  pressure = bme.readPressure() / 1000; //Convert to kPa by dividing the result by 1000.
  caseTemperature = bme.readTemperature();
}
55%
Step 7 - Wind Speed
The Anemometer works exactly like the Rain Gauge; magnets pass a sensor as the wind spins the sensor around. We will still need to take the same precautions as to count each occurrence only once just like the rain gauge. On top of that we have to consider that average wind speed is tightly coupled to time. To take this into account we will grab the time the measurement period starts and use it to figure out the exact duration of measurement in addition to our counted pulses.
Since this is very similar to the Rain Gauge, we will add all of the code in one step. Add your three variables, set the pin, flag, and startTime in setup1(), and add your counting code to loop1()
					#include <microDS18B20.h>
#include <Adafruit_Sensor.h>
#include <Adafruit_BME280.h>
#include <Wire.h>

//Calculated Values
double temperature;
double humidity;
double pressure;
double caseTemperature;
double measuredWind;
String windHeading;
double rainfall;

//DS18B20
MicroDS18B20<2> ds;

//BME280
unsigned status;
Adafruit_BME280 bme;

//Multicore Flag
boolean readData = false;

//Rain Gauge
int rainFlag = 1;
int rainCount = 0;

//Anemometer
int windFlag = 1;
int windCount = 0;
unsigned long startTime;

void setup() {
  // put your setup code here, to run once:
  Serial.begin(115200); //Connect to Serial
  while (!Serial);      //Pause code while we wait for Serial to connect

  //Configure the BME
  Wire.setSDA(16);
  Wire.setSCL(17);

  status = bme.begin(0x77, &Wire);
  if (!status) {
    Serial.println("Could not find a valid BME280 sensor, check wiring, address, sensor ID!");
    while (1) delay(10);
  }
}

void loop() {
  // put your main code here, to run repeatedly:

}

void setup1() {
  // setup your code here for the second core
  pinMode(3, INPUT_PULLUP); //Rain
  rainFlag = digitalRead(3);

  pinMode(4, INPUT_PULLUP); //Anemometer
  windFlag = digitalRead(4);
  startTime = millis(); //Set the intitial start time
}

void loop1() {
  //put your main code here, to run repeatedly on the second core:
  if (readData == false) {

    //Rain Gauge
    int rainInput = digitalRead(3);   //Read the rain sensor input
    if (rainInput == LOW && rainFlag == HIGH) //Compare to our flag
    {
      rainCount++;  //The sensor has transited low, increase our count by 1
    }
    else {} //Otherwise dont do anything

    rainFlag = rainInput;    //Set our flag to match our input


    //Anemometer
    int windInput = digitalRead(4); //Read the Anemeometer input
    if (windInput == LOW && windFlag == HIGH) //Compare to our flag
    {
      windCount++;  //The sensor has transited low, increase our count by 1
    }
    else {} //Otherwise dont do anything

    windFlag = windInput;    //Set our flag to match our input

  }
  else{}
}


//Function to collect all of our data
void collectData() {

  //DS18B20 Temperature
  ds.requestTemp();   //Request temperature from the sensor
  delay(1000);        //Wait 1 second for a response

  //If the sensor retrives data, write it to our temperature variable. Otherwise, return an error message
  if (ds.readTemp())  {
    temperature = ds.getTemp();
  }
  else {
    //Sensor not connected
    Serial.println("DS18B20 Not Connected");
  }

  //BME280
  humidity = bme.readHumidity();
  pressure = bme.readPressure() / 1000; //Convert to kPa by dividing the result by 1000.
  caseTemperature = bme.readTemperature();
}
64%
Step 8 - Wind Direction
Wind direction is not particularly complicated, our wind direction sensor outputs an analog value based on the direction it is pointing. The range of input on the Raspberry Pi Pico analog input is 0-1023. We have gone through and manually measured each of the different directions already so all we need to figure out which set of values our analog reading falls between and we will know the direction. There is no elegant way to do this other than test each value to see if it is between the two limit values of each heading. Since this ends up being quite a lot of code we will create a new function to just return the direction anytime it is called. It will read the sensor and output the direction in the form of a heading.
At the bottom of the program, add the calculateWindDirection function:
					#include <microDS18B20.h>
#include <Adafruit_Sensor.h>
#include <Adafruit_BME280.h>
#include <Wire.h>

//Calculated Values
double temperature;
double humidity;
double pressure;
double caseTemperature;
double measuredWind;
String windHeading;
double rainfall;

//DS18B20
MicroDS18B20<2> ds;

//BME280
unsigned status;
Adafruit_BME280 bme;

//Multicore Flag
boolean readData = false;

//Rain Gauge
int rainFlag = 1;
int rainCount = 0;

//Anemometer
int windFlag = 1;
int windCount = 0;
unsigned long startTime;

void setup() {
  // put your setup code here, to run once:
  Serial.begin(115200); //Connect to Serial
  while (!Serial);      //Pause code while we wait for Serial to connect

  //Configure the BME
  Wire.setSDA(16);
  Wire.setSCL(17);

  status = bme.begin(0x77, &Wire);
  if (!status) {
    Serial.println("Could not find a valid BME280 sensor, check wiring, address, sensor ID!");
    while (1) delay(10);
  }
}

void loop() {
  // put your main code here, to run repeatedly:

}

void setup1() {
  // setup your code here for the second core
  pinMode(3, INPUT_PULLUP); //Rain
  rainFlag = digitalRead(3);

  pinMode(4, INPUT_PULLUP); //Anemometer
  windFlag = digitalRead(4);
  startTime = millis(); //Set the intitial start time
}

void loop1() {
  //put your main code here, to run repeatedly on the second core:
  if (readData == false) {

    //Rain Gauge
    int rainInput = digitalRead(3);   //Read the rain sensor input
    if (rainInput == LOW && rainFlag == HIGH) //Compare to our flag
    {
      rainCount++;  //The sensor has transited low, increase our count by 1
    }
    else {} //Otherwise dont do anything

    rainFlag = rainInput;    //Set our flag to match our input


    //Anemometer
    int windInput = digitalRead(4); //Read the Anemeometer input
    if (windInput == LOW && windFlag == HIGH) //Compare to our flag
    {
      windCount++;  //The sensor has transited low, increase our count by 1
    }
    else {} //Otherwise dont do anything

    windFlag = windInput;    //Set our flag to match our input

  }
  else{}
}


//Function to collect all of our data
void collectData() {

  //DS18B20 Temperature
  ds.requestTemp();   //Request temperature from the sensor
  delay(1000);        //Wait 1 second for a response

  //If the sensor retrives data, write it to our temperature variable. Otherwise, return an error message
  if (ds.readTemp())  {
    temperature = ds.getTemp();
  }
  else {
    //Sensor not connected
    Serial.println("DS18B20 Not Connected");
  }

  //BME280
  humidity = bme.readHumidity();
  pressure = bme.readPressure() / 1000; //Convert to kPa by dividing the result by 1000.
  caseTemperature = bme.readTemperature();
}

//Calculate our wind direction
String calculateWindDirection()
{
  String s = "N/A";
  int reading = analogRead(A0);

  if (reading >= 250 && reading <= 284) {
    s = "ESE";
  } else if (reading >= 285 && reading <= 304) {
    s = "ENE";
  } else if (reading >= 305 && reading <= 324) {
    s = "E";
  } else if (reading >= 325 && reading <= 374) {
    s = "SSE";
  } else if (reading >= 375 && reading <= 450) {
    s = "SE";
  } else if (reading >= 451 && reading <= 509) {
    s = "SSW";
  } else if (reading >= 510 && reading <= 549) {
    s = "S";
  } else if (reading >= 550 && reading <= 649) {
    s = "NNE";
  } else if (reading >= 650 && reading <= 724) {
    s = "NE";
  } else if (reading >= 725 && reading <= 797) {
    s = "WSW";
  } else if (reading >= 798 && reading <= 824) {
    s = "SW";
  } else if (reading >= 825 && reading <= 874) {
    s = "NNW";
  } else if (reading >= 875 && reading <= 909) {
    s = "N";
  } else if (reading >= 910 && reading <= 934) {
    s = "WNW";
  } else if (reading >= 935 && reading <= 974) {
    s = "NW";
  } else if (reading >= 975 && reading <= 1023) {
    s = "W";
  } else {
    s = "N/A";
  }
  return s;
}
Since the wind direction is not handled by the second core at all, we can add it to our collectData() function without any further code. Add it just under our BME280 readings (line 116):
					#include <microDS18B20.h>
#include <Adafruit_Sensor.h>
#include <Adafruit_BME280.h>
#include <Wire.h>

//Calculated Values
double temperature;
double humidity;
double pressure;
double caseTemperature;
double measuredWind;
String windHeading;
double rainfall;

//DS18B20
MicroDS18B20<2> ds;

//BME280
unsigned status;
Adafruit_BME280 bme;

//Multicore Flag
boolean readData = false;

//Rain Gauge
int rainFlag = 1;
int rainCount = 0;

//Anemometer
int windFlag = 1;
int windCount = 0;
unsigned long startTime;

void setup() {
  // put your setup code here, to run once:
  Serial.begin(115200); //Connect to Serial
  while (!Serial);      //Pause code while we wait for Serial to connect

  //Configure the BME
  Wire.setSDA(16);
  Wire.setSCL(17);

  status = bme.begin(0x77, &Wire);
  if (!status) {
    Serial.println("Could not find a valid BME280 sensor, check wiring, address, sensor ID!");
    while (1) delay(10);
  }
}

void loop() {
  // put your main code here, to run repeatedly:

}

void setup1() {
  // setup your code here for the second core
  pinMode(3, INPUT_PULLUP); //Rain
  rainFlag = digitalRead(3);

  pinMode(4, INPUT_PULLUP); //Anemometer
  windFlag = digitalRead(4);
  startTime = millis(); //Set the intitial start time
}

void loop1() {
  //put your main code here, to run repeatedly on the second core:
  if (readData == false) {

    //Rain Gauge
    int rainInput = digitalRead(3);   //Read the rain sensor input
    if (rainInput == LOW && rainFlag == HIGH) //Compare to our flag
    {
      rainCount++;  //The sensor has transited low, increase our count by 1
    }
    else {} //Otherwise dont do anything

    rainFlag = rainInput;    //Set our flag to match our input


    //Anemometer
    int windInput = digitalRead(4); //Read the Anemeometer input
    if (windInput == LOW && windFlag == HIGH) //Compare to our flag
    {
      windCount++;  //The sensor has transited low, increase our count by 1
    }
    else {} //Otherwise dont do anything

    windFlag = windInput;    //Set our flag to match our input

  }
  else{}
}


//Function to collect all of our data
void collectData() {

  //DS18B20 Temperature
  ds.requestTemp();   //Request temperature from the sensor
  delay(1000);        //Wait 1 second for a response

  //If the sensor retrives data, write it to our temperature variable. Otherwise, return an error message
  if (ds.readTemp())  {
    temperature = ds.getTemp();
  }
  else {
    //Sensor not connected
    Serial.println("DS18B20 Not Connected");
  }

  //BME280
  humidity = bme.readHumidity();
  pressure = bme.readPressure() / 1000; //Convert to kPa by dividing the result by 1000.
  caseTemperature = bme.readTemperature();

  //Wind Direction
  windHeading = calculateWindDirection();
}

//Calculate our wind direction
String calculateWindDirection()
{
  String s = "N/A";
  int reading = analogRead(A0);

  if (reading >= 250 && reading <= 284) {
    s = "ESE";
  } else if (reading >= 285 && reading <= 304) {
    s = "ENE";
  } else if (reading >= 305 && reading <= 324) {
    s = "E";
  } else if (reading >= 325 && reading <= 374) {
    s = "SSE";
  } else if (reading >= 375 && reading <= 450) {
    s = "SE";
  } else if (reading >= 451 && reading <= 509) {
    s = "SSW";
  } else if (reading >= 510 && reading <= 549) {
    s = "S";
  } else if (reading >= 550 && reading <= 649) {
    s = "NNE";
  } else if (reading >= 650 && reading <= 724) {
    s = "NE";
  } else if (reading >= 725 && reading <= 797) {
    s = "WSW";
  } else if (reading >= 798 && reading <= 824) {
    s = "SW";
  } else if (reading >= 825 && reading <= 874) {
    s = "NNW";
  } else if (reading >= 875 && reading <= 909) {
    s = "N";
  } else if (reading >= 910 && reading <= 934) {
    s = "WNW";
  } else if (reading >= 935 && reading <= 974) {
    s = "NW";
  } else if (reading >= 975 && reading <= 1023) {
    s = "W";
  } else {
    s = "N/A";
  }
  return s;
}
73%
Step 9 - Collecting The Core 2 Data
We are just about done with the code. The last step before printing the data is to grab our counts that are done by core 2. This is done by pausing our counting code, grabbing our data, resetting the counts, and restarting the counting code. Once the count has restarted, we will also grab the new start time for our next measurement interval. As we grab the data we will also convert it to useful units:
- Our rainfall is easy to calculate. We have counted the number of times the bucket has tipped so all we need to do is multiply this by 0.2794mm and the result is the millimeters of rain that have fallen.
- Wind is a little more complex as we need to take into account the measurement duration to correctly calculate the average count per second. A count of 1 pulse per second results in 2.4 km/h wind speed so all we need to do is calculate what the average number of pulses per second were over the measurement period and multiply by 2.4km/h to get wind speed.
Add the following code at line 119:
					#include <microDS18B20.h>
#include <Adafruit_Sensor.h>
#include <Adafruit_BME280.h>
#include <Wire.h>

//Calculated Values
double temperature;
double humidity;
double pressure;
double caseTemperature;
double measuredWind;
String windHeading;
double rainfall;

//DS18B20
MicroDS18B20<2> ds;

//BME280
unsigned status;
Adafruit_BME280 bme;

//Multicore Flag
boolean readData = false;

//Rain Gauge
int rainFlag = 1;
int rainCount = 0;

//Anemometer
int windFlag = 1;
int windCount = 0;
unsigned long startTime;

void setup() {
  // put your setup code here, to run once:
  Serial.begin(115200); //Connect to Serial
  while (!Serial);      //Pause code while we wait for Serial to connect

  //Configure the BME
  Wire.setSDA(16);
  Wire.setSCL(17);

  status = bme.begin(0x77, &Wire);
  if (!status) {
    Serial.println("Could not find a valid BME280 sensor, check wiring, address, sensor ID!");
    while (1) delay(10);
  }
}

void loop() {
  // put your main code here, to run repeatedly:

}

void setup1() {
  // setup your code here for the second core
  pinMode(3, INPUT_PULLUP); //Rain
  rainFlag = digitalRead(3);

  pinMode(4, INPUT_PULLUP); //Anemometer
  windFlag = digitalRead(4);
  startTime = millis(); //Set the intitial start time
}

void loop1() {
  //put your main code here, to run repeatedly on the second core:
  if (readData == false) {

    //Rain Gauge
    int rainInput = digitalRead(3);   //Read the rain sensor input
    if (rainInput == LOW && rainFlag == HIGH) //Compare to our flag
    {
      rainCount++;  //The sensor has transited low, increase our count by 1
    }
    else {} //Otherwise dont do anything

    rainFlag = rainInput;    //Set our flag to match our input


    //Anemometer
    int windInput = digitalRead(4); //Read the Anemeometer input
    if (windInput == LOW && windFlag == HIGH) //Compare to our flag
    {
      windCount++;  //The sensor has transited low, increase our count by 1
    }
    else {} //Otherwise dont do anything

    windFlag = windInput;    //Set our flag to match our input

  }
  else{}
}


//Function to collect all of our data
void collectData() {

  //DS18B20 Temperature
  ds.requestTemp();   //Request temperature from the sensor
  delay(1000);        //Wait 1 second for a response

  //If the sensor retrives data, write it to our temperature variable. Otherwise, return an error message
  if (ds.readTemp())  {
    temperature = ds.getTemp();
  }
  else {
    //Sensor not connected
    Serial.println("DS18B20 Not Connected");
  }

  //BME280
  humidity = bme.readHumidity();
  pressure = bme.readPressure() / 1000; //Convert to kPa by dividing the result by 1000.
  caseTemperature = bme.readTemperature();

  //Wind Direction
  windHeading = calculateWindDirection();

   //Core 2 Values
  readData = true; //Pause count in Core 2
  delay(1);

  //Rainfall
  rainfall = rainCount * 0.2794; //Calculate how many mm of rain (count * tipping gauge volume in mm)
  rainCount = 0;  //Reset the rainfall count

  //Wind Speed

  unsigned long sampleDuration = millis() - startTime; //Calculate the duration of the measurement
  double duration = sampleDuration / 1000; //Convert to seconds from milliseconds
  measuredWind = (double)(windCount / duration) * 2.4;   //Figure out the average count per second, multiply by 2.4km/h (1 count/second = 2.4km/h)
  windCount = 0; //Reset the wind count

  readData = false; //Restart Count in Core 2
  startTime = millis(); //Grab the start time
}

//Calculate our wind direction
String calculateWindDirection()
{
  String s = "N/A";
  int reading = analogRead(A0);

  if (reading >= 250 && reading <= 284) {
    s = "ESE";
  } else if (reading >= 285 && reading <= 304) {
    s = "ENE";
  } else if (reading >= 305 && reading <= 324) {
    s = "E";
  } else if (reading >= 325 && reading <= 374) {
    s = "SSE";
  } else if (reading >= 375 && reading <= 450) {
    s = "SE";
  } else if (reading >= 451 && reading <= 509) {
    s = "SSW";
  } else if (reading >= 510 && reading <= 549) {
    s = "S";
  } else if (reading >= 550 && reading <= 649) {
    s = "NNE";
  } else if (reading >= 650 && reading <= 724) {
    s = "NE";
  } else if (reading >= 725 && reading <= 797) {
    s = "WSW";
  } else if (reading >= 798 && reading <= 824) {
    s = "SW";
  } else if (reading >= 825 && reading <= 874) {
    s = "NNW";
  } else if (reading >= 875 && reading <= 909) {
    s = "N";
  } else if (reading >= 910 && reading <= 934) {
    s = "WNW";
  } else if (reading >= 935 && reading <= 974) {
    s = "NW";
  } else if (reading >= 975 && reading <= 1023) {
    s = "W";
  } else {
    s = "N/A";
  }
  return s;
}
82%
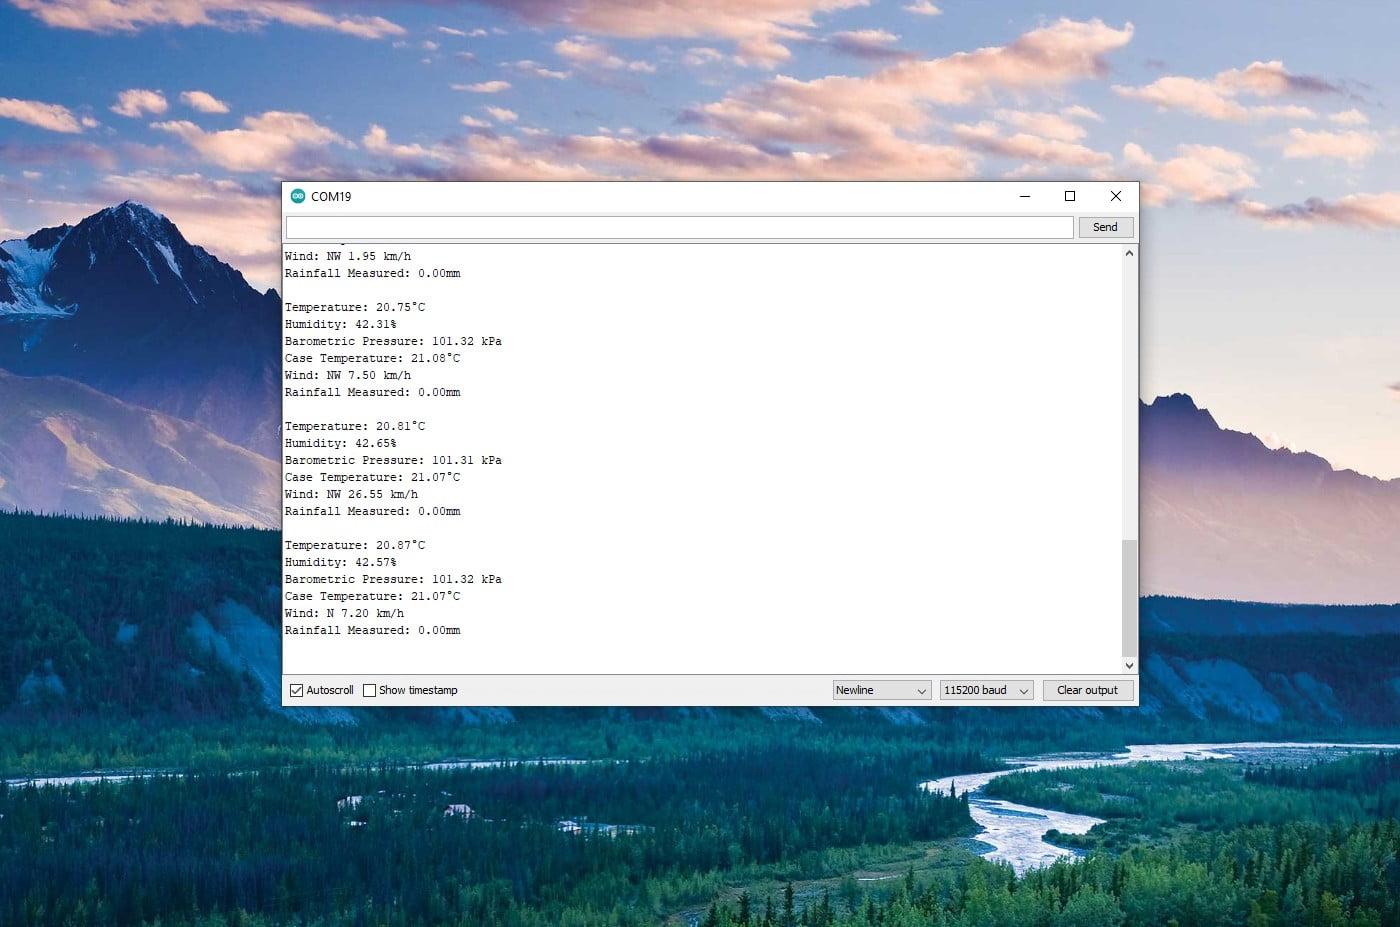
Step 10 - Printing The Data
Finally, we will need to create the initial loop that runs every 15 seconds and calls the collectData function. We will also print all of the values to the serial monitor so we can ensure everything is working correctly.
In our original loop (for core 1, which should be empty right now) add the following code to collect and print the data.
					#include <microDS18B20.h>
#include <Adafruit_Sensor.h>
#include <Adafruit_BME280.h>
#include <Wire.h>

//Calculated Values
double temperature;
double humidity;
double pressure;
double caseTemperature;
double measuredWind;
String windHeading;
double rainfall;

//DS18B20
MicroDS18B20<2> ds;

//BME280
unsigned status;
Adafruit_BME280 bme;

//Multicore Flag
boolean readData = false;

//Rain Gauge
int rainFlag = 1;
int rainCount = 0;

//Anemometer
int windFlag = 1;
int windCount = 0;
unsigned long startTime;

void setup() {
  // put your setup code here, to run once:
  Serial.begin(115200); //Connect to Serial
  while (!Serial);      //Pause code while we wait for Serial to connect

  //Configure the BME
  Wire.setSDA(16);
  Wire.setSCL(17);

  status = bme.begin(0x77, &Wire);
  if (!status) {
    Serial.println("Could not find a valid BME280 sensor, check wiring, address, sensor ID!");
    while (1) delay(10);
  }
}

void loop() {
  // put your main code here, to run repeatedly:
  delay(15000); //Wait 15 seconds
  collectData(); // Run our data collection function

  //Print our results to the serial monitor
  Serial.print("Temperature: ");
  Serial.print(temperature);
  Serial.println("°C");

  Serial.print("Humidity: ");
  Serial.print(humidity);
  Serial.println("%");

  Serial.print("Barometric Pressure: ");
  Serial.print(pressure);
  Serial.println(" kPa");

  Serial.print("Case Temperature: ");
  Serial.print(caseTemperature);
  Serial.println("°C");

  Serial.print("Wind: ");
  Serial.print(windHeading);
  Serial.print(" ");
  Serial.print(measuredWind);
  Serial.println(" km/h");

  Serial.print("Rainfall Measured: ");
  Serial.print(rainfall);
  Serial.println("mm");

  Serial.println();
}

void setup1() {
  // setup your code here for the second core
  pinMode(3, INPUT_PULLUP); //Rain
  rainFlag = digitalRead(3);

  pinMode(4, INPUT_PULLUP); //Anemometer
  windFlag = digitalRead(4);
  startTime = millis(); //Set the intitial start time
}

void loop1() {
  //put your main code here, to run repeatedly on the second core:
  if (readData == false) {

    //Rain Gauge
    int rainInput = digitalRead(3);   //Read the rain sensor input
    if (rainInput == LOW && rainFlag == HIGH) //Compare to our flag
    {
      rainCount++;  //The sensor has transited low, increase our count by 1
    }
    else {} //Otherwise dont do anything

    rainFlag = rainInput;    //Set our flag to match our input


    //Anemometer
    int windInput = digitalRead(4); //Read the Anemeometer input
    if (windInput == LOW && windFlag == HIGH) //Compare to our flag
    {
      windCount++;  //The sensor has transited low, increase our count by 1
    }
    else {} //Otherwise dont do anything

    windFlag = windInput;    //Set our flag to match our input

  }
  else {}
}


//Function to collect all of our data
void collectData() {

  //DS18B20 Temperature
  ds.requestTemp();   //Request temperature from the sensor
  delay(1000);        //Wait 1 second for a response

  //If the sensor retrives data, write it to our temperature variable. Otherwise, return an error message
  if (ds.readTemp())  {
    temperature = ds.getTemp();
  }
  else {
    //Sensor not connected
    Serial.println("DS18B20 Not Connected");
  }

  //BME280
  humidity = bme.readHumidity();
  pressure = bme.readPressure() / 1000; //Convert to kPa by dividing the result by 1000.
  caseTemperature = bme.readTemperature();

  //Wind Direction
  windHeading = calculateWindDirection();

  //Core 2 Values
  readData = true; //Pause count in Core 2
  delay(1);

  //Rainfall
  rainfall = rainCount * 0.2794; //Calculate how many mm of rain (count * tipping gauge volume in mm)
  rainCount = 0;  //Reset the rainfall count

  //Wind Speed

  unsigned long sampleDuration = millis() - startTime; //Calculate the duration of the measurement
  double duration = sampleDuration / 1000; //Convert to seconds from milliseconds
  measuredWind = (double)(windCount / duration) * 2.4;   //Figure out the average count per second, multiply by 2.4km/h (1 count/second = 2.4km/h)
  windCount = 0; //Reset the wind count

  readData = false; //Restart Count in Core 2
  startTime = millis(); //Grab the start time
}

//Calculate our wind direction
String calculateWindDirection()
{
  String s = "N/A";
  int reading = analogRead(A0);

  if (reading >= 250 && reading <= 284) {
    s = "ESE";
  } else if (reading >= 285 && reading <= 304) {
    s = "ENE";
  } else if (reading >= 305 && reading <= 324) {
    s = "E";
  } else if (reading >= 325 && reading <= 374) {
    s = "SSE";
  } else if (reading >= 375 && reading <= 450) {
    s = "SE";
  } else if (reading >= 451 && reading <= 509) {
    s = "SSW";
  } else if (reading >= 510 && reading <= 549) {
    s = "S";
  } else if (reading >= 550 && reading <= 649) {
    s = "NNE";
  } else if (reading >= 650 && reading <= 724) {
    s = "NE";
  } else if (reading >= 725 && reading <= 797) {
    s = "WSW";
  } else if (reading >= 798 && reading <= 824) {
    s = "SW";
  } else if (reading >= 825 && reading <= 874) {
    s = "NNW";
  } else if (reading >= 875 && reading <= 909) {
    s = "N";
  } else if (reading >= 910 && reading <= 934) {
    s = "WNW";
  } else if (reading >= 935 && reading <= 974) {
    s = "NW";
  } else if (reading >= 975 && reading <= 1023) {
    s = "W";
  } else {
    s = "N/A";
  }
  return s;
}
91%
Step 11 - Upload And Test
Once the code is completed, compile it, and upload it to your Pico. After a period of 15 seconds the first set of results should arrive and all sensors can be tested.
In the next part of this tutorial, we will look at connecting to WiFi and uploading the data to a data handling service.
100%
5 thoughts on “Raspberry Pi Pico Weather Station – Part 2 (Arduino)”
steve.elves
Blimey! It’s all done & working! Your tutorials are excellent!
When will the next tutorial be available? I’m anxious to get this puppy completed so I can mount it outdoors. We might have some weather, some day, you know…
Exuberantly,
Steve Elves
Alex
An excellent tutorial. Thanks. I’m looking forward to micropython version.
Alex
Any Idea when the micropython version will be available?
Graham
Another great tutorial. Really looking forward to the micropython version.
Steve Elves
How are you coming on the final tutorial – connection to WiFi and a data handling service?