BC Robotics
Browse categories
- New Additions
- Shop
- On Sale / Clearance
- Popular Categories
- ArduinoArduino is the most popular open source microcontroller platform on the market. These easy to program devices can read sensors, control relays, light up LEDs, and even talk to one another. Their ability to interact with the real world by way of sensors and other electronics makes them ideal for automation such as watering a plant when it is dry, reading the weather, or controlling lights when it gets dark – the possibilities are endless. We carry a variety of Arduino compatible microcontrollers from several manufacturers, each with their own specific strengths and purposes. To further specialize your microcontroller, we carry a large selection of daughter boards (shields) which can add powerful sensors, GPS, or even LCD screens to your project! Just getting started with microcontrollers? We carry a variety of Arduino starter kits to get you reading sensors and blinking lights as easily as quickly as possible!
- BBC micro:bitThe BBC micro:bit is a pocket-sized computer designed for beginners in electronics and coding. The micro:bit makes getting into these often daunting fields as easy as possible. Programming the micro:bit V2 can be done by computer or by their intuitive app available for Android and iOS devices. Code can be designed using a drag and drop interface in the Blocks editor, Javascript, or Python.
- ESP8266 & ESP32The ESP8266 and ESP32 microcontrollers from Espressif are powerful, inexpensive, and feature integrated WiFi connectivity. These are ideal for IoT applications. We offer a variety of different ESP8266 and ESP32 modules for different skill levels.
- FeatherFeather is a flexible and powerful family of microcontroller main-boards (Feathers) and daughter-boards (Wings) designed with portability in mind. All Feathers have integrated battery connectors (and most have built in lipo chargers) The Feather form factor is not locked to a specific chipset or programming language. Feathers are available with a variety of chipsets and on-board features. Most Feathers and FeatherWings have example code and libraries written in Arduino C/C++ and CircuitPython.
- Makey MakeyThe Makey Makey kit is a electronics kit designed for beginners. It explores the concepts of creating circuits through everyday items. When plugged into a computer you can use the Makey Makey to make anything into a keyboard or mouse. No programming required! Projects like a Banana Drum Set, Cat Detector, Musical Stairs, and countless others are easier than you think! We carry the Makey Makey Classic Kit – a starter kit for the Makey Makey – along with extra alligator clips, copper conductive tape, and replacement cables.
- Raspberry PiThe Raspberry Pi was first introduced in early 2012 as a simple, low cost, computer fit onto a circuit board roughly the size of a credit card. The idea was to use this low cost computer to promote teaching of computer science in schools but it has grown to be so much more! Since its release, well over 30 million of these little computers have been sold. We have carried the Raspberry Pi in Canada since it first became available and have watched as the Pi has morphed into a complete development platform with powerful single-board computers, cameras, touchscreens, and other accessories. Its multitude of inputs and outputs for electronics and computer peripherals and its impressive computing power mean it can be used to make just about anything you can imagine. The newest and most powerful version, the Raspberry Pi 4, is now available!
- Popular Brands
- AdafruitAdafruit was founded in 2005 by MIT engineer, Limor “Ladyada” Fried. Her goal was to create the best place online for learning electronics and making the best designed products for makers of all ages and skill levels. In the last 10 years, Adafruit has grown to over 100+ employees in the heart of NYC with a 50,000+ sq ft. factory.
- ArduinoArduino is an ever growing platform used by some of the most popular microcontrollers out there. For many of us, this is where it all started – the Arduino was (and still is today) a pioneer when it comes to making programming hardware easy and accessible. We have one of the largest selections of Arduino and Arduino accessories in Canada. These range from basic Arduino Uno, to Cellular and WiFi connected devices perfect for the Internet of Things, and all the accessories needed to get them running!
- Micro:bitMicro:bit Educational Foundation are the manufacturers of the popular BBC micro:bit; a pocket-sized computer designed for beginners in electronics and coding. The micro:bit makes getting into these often daunting fields as easy as possible. Programming the micro:bit V2 can be done by computer or by their intuitive app available for Android and iOS devices. Code can be designed using a drag and drop interface in the Blocks editor, Javascript, or Python.
- BC RoboticsIn addition to stocking 2000+ unique items, we also manufacture our own accessories right here at BC Robotics. In 2014 we began developing our own widgets and add-ons for Arduino, Raspberry Pi, and general prototyping. This has now grown to over 80 different SKUs. Our boards are assembled in-house with top quality components. Many feature detailed tutorials or project guides to get you up and running as quickly as possible!
- Raspberry Pi
- SparkFunSince 2003, SparkFun has been helping turn ideas into reality – whether you’re creating a smart weather station, exploring the frontier of machine learning, building a robot for school or prototyping your first (or tenth) product. No matter your vision or skill level, our open source components, resources and online tutorials are designed to broaden access to innovative technology and make the road to a finished project shorter. We’re here to help you start something.
- Frequently Asked Questions
- My Account
- Wishlist
- Cart
Free Shipping - US & Canada @ $150 CAD
Raspberry Pi Weather Station – Part 4
PRODUCT TUTORIAL
- Chris @ BCR
- August 30, 2018
- 10:28 am
- 44 Comments
We are almost there – in the past three Raspberry Pi Weather Station tutorials we have assembled the weather station electronics, wrote the code to gather data, and set up ThingSpeak to collect and display the data – now we just need to get it outside. In the final part of this tutorial we are going to set up the Pi to run our weather station code automatically, look at how to protect the Pi from the elements, and discuss placement of your weather station and the logistics of it being outside.
Overview:
Before we get started, you should have completed the previous three sections of this tutorial. This section of the tutorial wont involve much coding, and will be very subjective to your location. We will try to break this down to keep it as simple as possible as always, but if you have specific questions pertaining to this section of the tutorial, please feel free to post them below. We will start by getting the last little bit of coding out of the way by modifying our Pi’s rc.local file to boot the weather code automatically. Next, we will look at protecting the Pi and its sensors, while still maintaining somewhat accurate readings. We will then tackle where to place your weather station and what you need to consider when doing this.
Requirements:
This tutorial requires several items:
Required Items:
Completed assembly from Part 1 of this tutorial set
Completed code from Part 2 of this tutorial set
Completed setup from Part 3 of this tutorial set
Raspberry Pi Compatible Power Supply
USB Keyboard & Mouse
HDMI Monitor
Internet Access
Step 1 - One Last Update To The Code
We are going to add one line to the very top of our python script. It is used to instruct the interpreter which version of python we want to use. Since we have written this in python3 it is a good idea to make sure it runs in the python3 environment.
Once this has been added as shown, save and test it using the F5 key. Once you have confirmed everything still works, we can move on to the next step!
					#!/usr/bin/python3

import time
from w1thermsensor import W1ThermSensor

import board
import busio
from adafruit_bme280 import basic as adafruit_bme280
i2c = busio.I2C(board.SCL, board.SDA)

import adafruit_ads1x15.ads1015 as ADS
from adafruit_ads1x15.analog_in import AnalogIn

import RPi.GPIO as GPIO
import requests

key = "1GAFNXQBV532Q097" #Insert your ThingSpeak Key here

bme = adafruit_bme280.Adafruit_BME280_I2C(i2c)
ads = ADS.ADS1015(i2c)
ads.gain = 1

ds18b20 = W1ThermSensor()

interval = 15 #How long we want to wait between loops (seconds)
windTick = 0 #Used to count the number of times the wind speed input is triggered
rainTick = 0 #Used to count the number of times the rain input is triggered

#Set GPIO pins to use BCM pin numbers
GPIO.setmode(GPIO.BCM)

#Set digital pin 17 to an input and enable the pullup
GPIO.setup(17, GPIO.IN, pull_up_down=GPIO.PUD_UP)

#Set digital pin 23 to an input and enable the pullup
GPIO.setup(23, GPIO.IN, pull_up_down=GPIO.PUD_UP)

#Event to detect wind (4 ticks per revolution)
GPIO.add_event_detect(17, GPIO.BOTH)
def windtrig(self):
    global windTick
    windTick += 1

GPIO.add_event_callback(17, windtrig)

#Event to detect rainfall tick
GPIO.add_event_detect(23, GPIO.FALLING)
def raintrig(self):
    global rainTick
    rainTick += 1

GPIO.add_event_callback(23, raintrig)

while True:

    time.sleep(interval)

    #Pull Temperature from DS18B20
    temperature = ds18b20.get_temperature()

    #Pull temperature from BME280
    case_temp = bme.temperature

    #Pull pressure from BME280 Sensor & convert to kPa
    pressure_pa = bme.pressure
    pressure = pressure_pa / 10

    #Pull humidity from BME280
    humidity = bme.humidity

    #Calculate wind direction based on ADC reading
    chan = AnalogIn(ads, ADS.P0)
    val = chan.value
    windDir = "Not Connected"
    windDeg = 999

    if 20000 <= val <= 20500:
        windDir = "N"
        windDeg = 0

    if 10000 <= val <= 10500:
        windDir = "NNE"
        windDeg = 22.5

    if 11500 <= val <= 12000:
        windDir = "NE"
        windDeg = 45

    if 2000 <= val <= 2250:
        windDir = "ENE"
        windDeg = 67.5

    if 2300 <= val <= 2500:
        windDir = "E"
        windDeg = 90

    if 1500 <= val <= 1950:
        windDir = "ESE"
        windDeg = 112.5

    if 4500 <= val <= 4900:
        windDir = "SE"
        windDeg = 135

    if 3000 <= val <= 3500:
        windDir = "SSE"
        windDeg = 157.5

    if 7000 <= val <= 7500:
        windDir = "S"
        windDeg = 180

    if 6000 <= val <= 6500:
        windDir = "SSW"
        windDeg = 202.5

    if 16000 <= val <= 16500:
        windDir = "SW"
        windDeg = 225

    if 15000 <= val <= 15500:
        windDir = "WSW"
        windDeg = 247.5

    if 24000 <= val <= 24500:
        windDir = "W"
        windDeg = 270

    if 21000 <= val <= 21500:
        windDir = "WNW"
        windDeg = 292.5

    if 22500 <= val <= 23000:
        windDir = "NW"
        windDeg = 315

    if 17500 <= val <= 18500:
        windDir = "NNW"
        windDeg = 337.5

    #Calculate average windspeed over the last 15 seconds
    windSpeed = (windTick * 1.2) / interval
    windTick = 0

    #Calculate accumulated rainfall over the last 15 seconds
    rainFall = rainTick * 0.2794
    rainTick = 0

## Comment this section out, no longer needed
    #Print the results
    #print( "Temperature: " , temperature)
    #print( "Humidity: " , humidity, "%")
    #print( "Pressure: " , pressure, "kPa")
    #print( "Wind Dir: " , windDir, " (", windDeg, ")")
    #print( "Wind Speed: " , windSpeed, "KPH")
    #print( "Rainfall: " , rainFall, "mm")
    #print( " ")

    #Configure Parameters to Send
    params = {'field1':temperature,'field2':humidity,'field3':pressure,'field4':windSpeed,'field5': windDeg,'field6':rainFall}

    #Configure header
    headerSt = {'Content-Type': 'application/json'}

    #Send Data
    conn = requests.post('http://api.thingspeak.com/update?api_key=' + key, json = params, headers = headerSt )
    print(conn) #Print the result
    conn.close()
10%
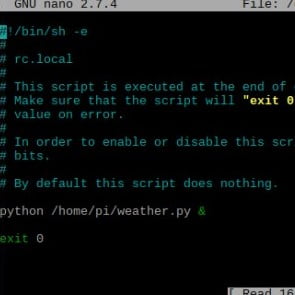
Step 2 – Configure Your Code To Start Automatically
Now that our python code is completed, we can close idle and go back to the terminal. We are now going to add an entry to a file that runs as soon as the Pi boots up. This entry is going to tell the Pi to run our Python file – and therefore, our python code will run anytime the pi boots up. That way, if you move your Pi, lose power, etc it will just start back up normally as soon as it gets power again.
To do this we are going to edit the rc.local system file with the built in “nano” text editor. See our Tutorial: Running a Python Program on boot with the Raspberry Pi
Running Python Programs On Boot
20%
Step 3 – Make Sure It Starts Automatically
While your Pi is rebooting; open up your ThingSpeak channel on another device. We are going to check to make sure our ThingSpeak channel starts receiving data to ensure the program started – remember it will take about 15 seconds from boot up to start sending data. Once we have confirmed data is being sent we can move onto the next step.
If you do not see any data appearing, try running the command you used in the rc.local file directly in the terminal. If it does not run, check the error code.
30%
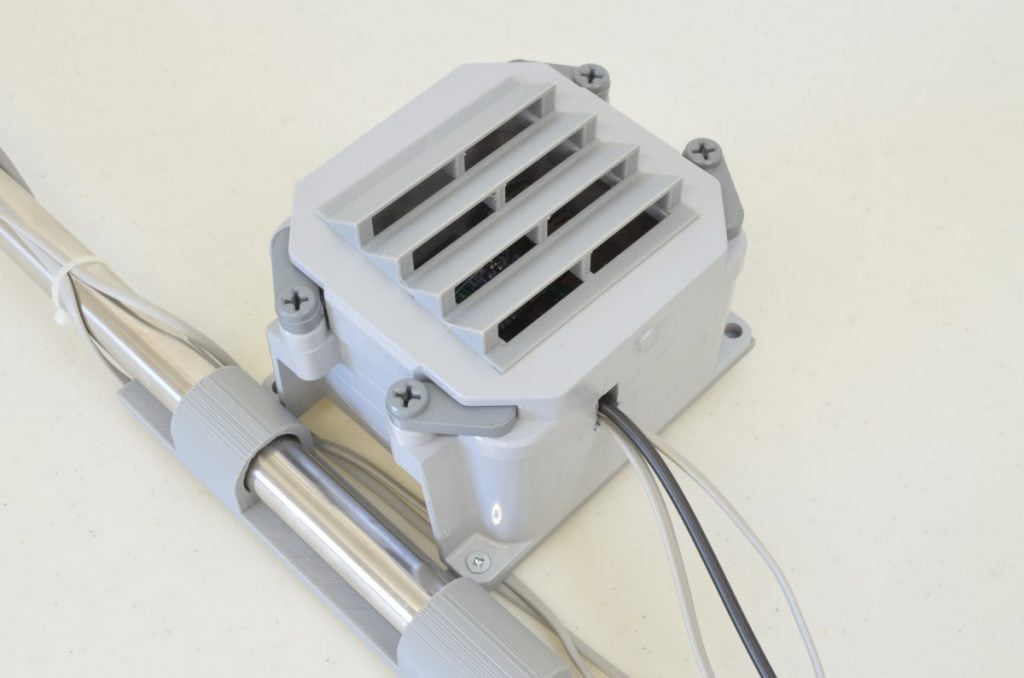
Step 4 – Weatherproofing
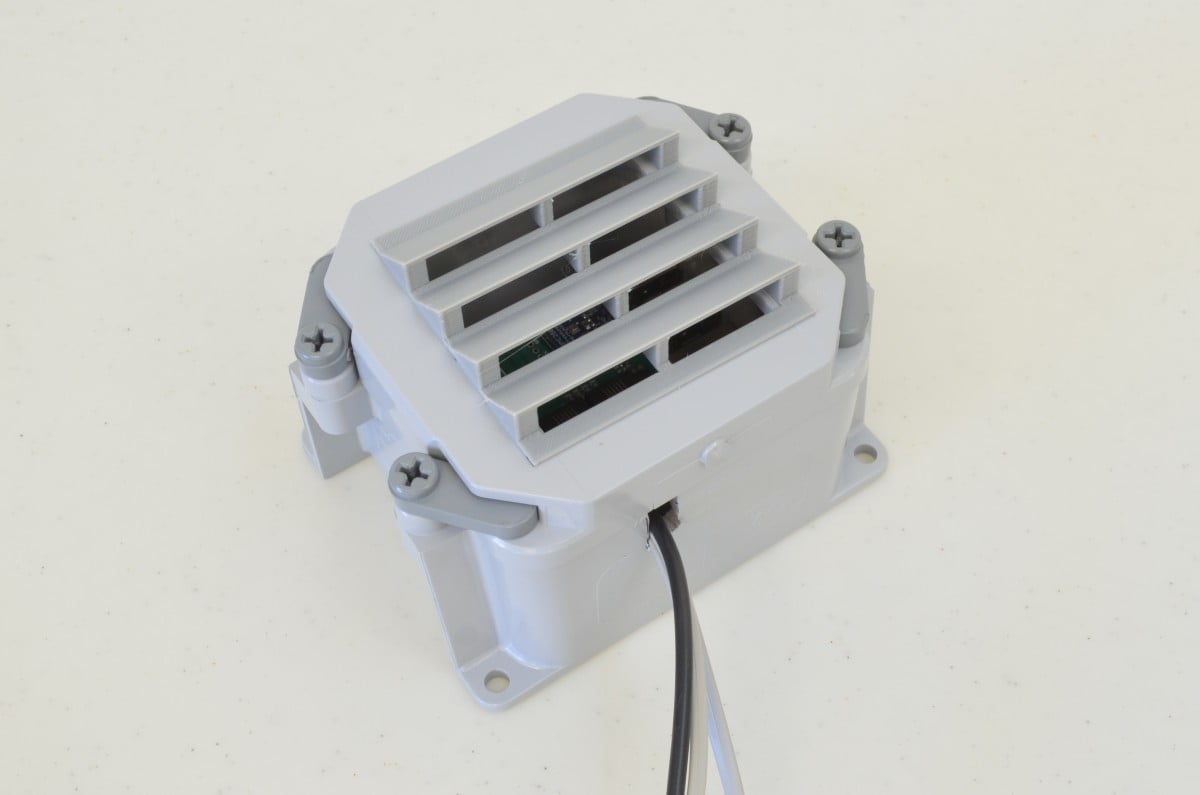
Before we move the station outside, we need to look at protecting the Pi. This part of the project is probably the most tricky and will require creativity to get accurate results without causing damage to the Pi and the sensor. Our goal is to protect the Pi and Protect the BME280 sensor, but still allow the BME280 to sense the environment accurately. The key issues being that the BME will not tolerate direct contact with water, but we still need it to have air passing over the sensor from the environment.
We wont ever claim our method is best, but to accomplish this we have modified one of our Weatherproof 4×4 Boxes to allow for some airflow. This box is a very tight fit (and wont work if you are planning to use ethernet). Our modification is simple – cut a large hole in the lid of the box and cover it with a 3D printed louver panel we quickly threw together and printed. If you are interested in printing it, we have made the file available here. If you are worried about spiders and bugs making a home inside, we recommend installing a piece of window screen between the louver panel and the box, it should keep most things out!
To allow the cables for the sensors and power to get out of the box we have notched the bottom wide enough for all the cabling to fit. It will be sealed later with silicone.
40%
Step 5 – Stevenson Screen
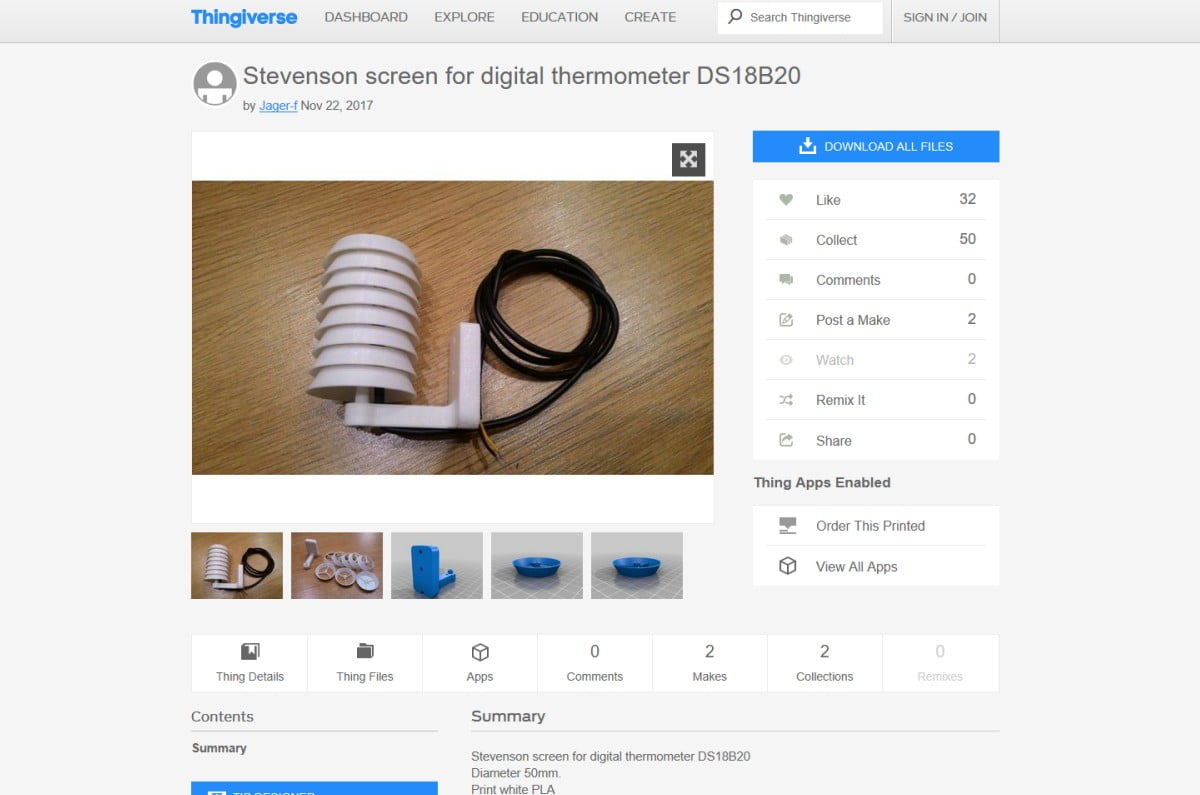
To accurately measure air temperature, the temperature sensor cannot be in direct sunlight. Weather stations will typically have a Stevenson Screen of some sort surrounding the sensor to ensure and accurate reading. We found this awesome little Stevenson Screen on Thingiverse specifically made for the DS18B20 temperature sensor – if you have access to a 3D printer this may be the easiest method!
50%
Step 6 – Moving Outside
Now that the weather station is ready to live in the elements, it is time to think about moving this project outside. Weather Underground has excellent information on placing your weather station – we suggest having a read through it as there are a lot of things to consider.
https://www.wunderground.com/weatherstation/installationguide.asp
Depending on your location, some of these recommendations may not be reasonable. Also, when locating the station, consider that you will have to get power to your Pi and it will need a reliable WiFi connection.
60%
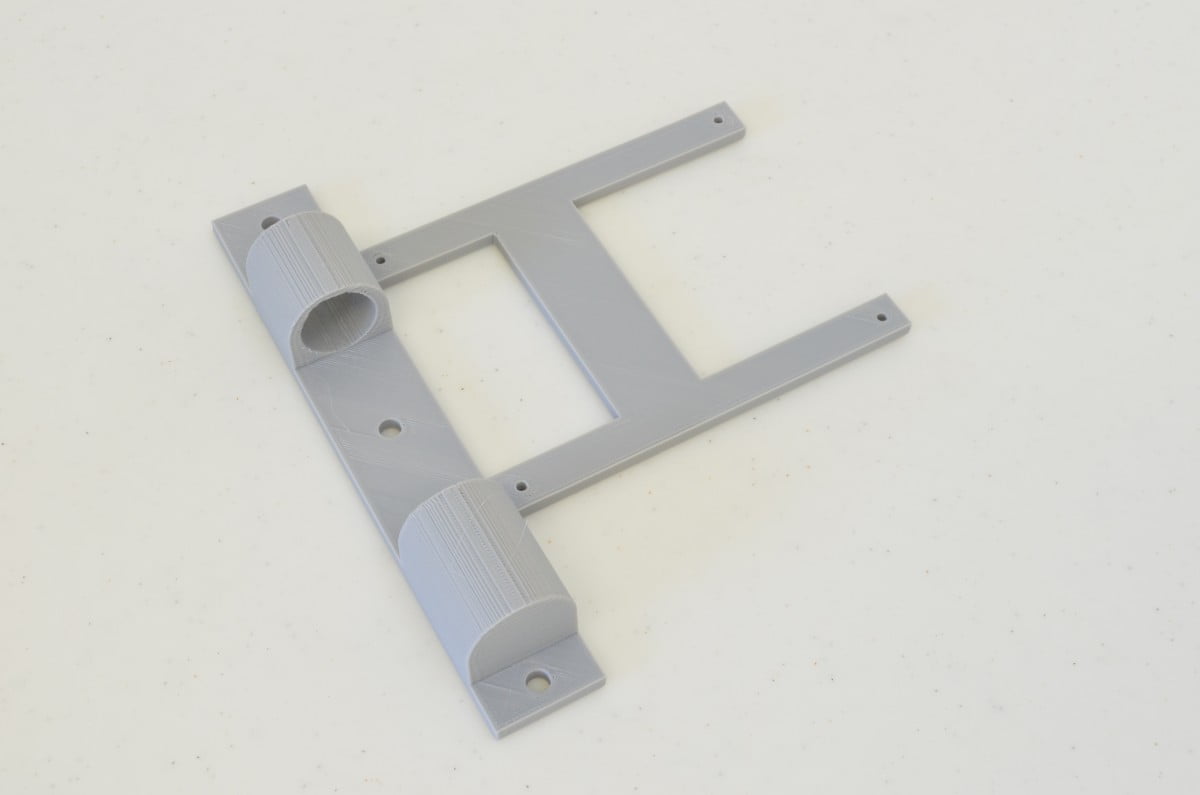
Step 7 – Mounting The Station
Now that you have found a suitable location to mount your weather station, it is time to figure out how to mount it. Our station is going to live on top of a 4×4 fence post, so we quickly threw together this mounting bracket to hold the sensor mast and the box. We have made the files available for download / modification. Our bracket is designed for a slightly larger diameter mast than the one that ships with the Weather Meters – so we have included the Sketchup File to modify it as well.
70%
Step 8 – Outdoor Power
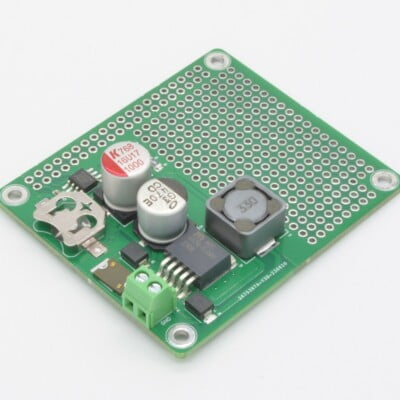
For our installation, power is being provided by an existing 12V power source. We will also be adding one of our Power HATs under the weather board. Your solution for powering may vary, but we tend to recommend supplying 12VDC from a power supply in a safe, dry location, and running a 12V line out to the Pi. Why 12V? Well, 12v power adapters are incredibly common, you don’t need to worry about voltage drop, and it is useful for other outdoor projects! Just keep in mind: Once the 12V line gets to the enclosure, it will need to be regulated to 5VDC for the Pi.
80%
Step 9 – Remote Management
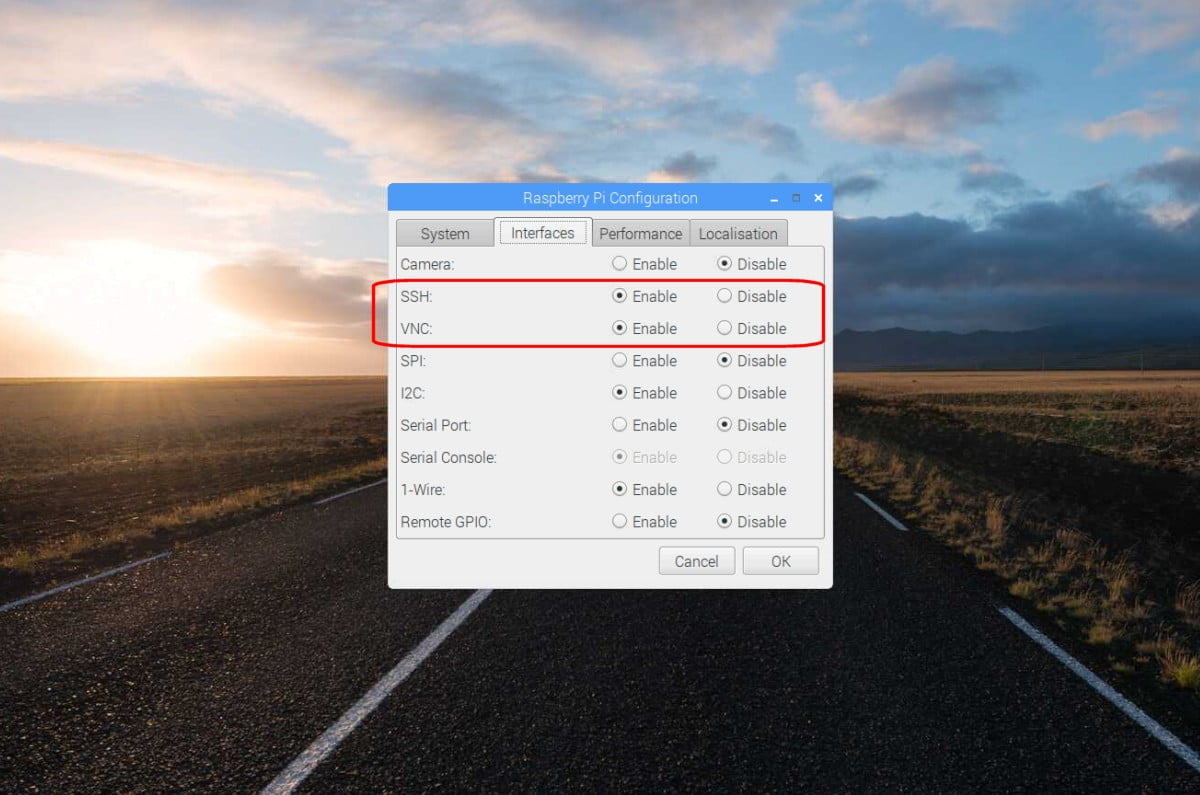
One last consideration: If you are working on this project using a Keyboard, Mouse, and monitor it is going to be very difficult to make changes to your Pi once it is living outside. We will want to leverage the remote management capabilities of the Pi! Click the Raspberry Pi logo up in the corner, and open Preferences, and click Raspberry Pi Configuration. Under the tab “Interfaces” you will want to enable VNC (and SSH if you plan to use it as well)
For most users VNC will be more than adequate – this allows you to work on your Raspberry Pi as if you had a keyboard, monitor, and mouse directly plugged in. If you want to look into this more, be sure to check out the VNC Tutorial by the Raspberry Pi Foundation.
90%
Step 10 – Final Setup
Now that everything is running it is time to move it outside! Power it up, double check it is sending out data – you should now have a fully operational weather station!
Looking to add more? There are many areas this project can be expanded upon – we suggest looking at Air Quality (particulate and smoke), VOC monitoring, UV rating, Light Level, a Camera, and Ground Temperature – all useful and interesting things to monitor! If you have a question pertaining to this tutorial, or if you would like to share your completed weather station, please feel free to post below!
100%
44 thoughts on “Raspberry Pi Weather Station – Part 4”
Chris @ BCR
The station is now permanently set up
Chris @ BCR
Now that it has rained since it was installed the rain graphs have been configured to be a bit more useful. The 3 rainfall graphs are Real time (15 second updates) , 24 hours of Hourly Totals, an 5 days of Daily Totals. Also added a Wind Speed / Direction read-out
mike87
How are the text boxes made?
Louis De Lange
I notice on your weather page you display light level. Is this a solar radiation sensor? If so, which one do you use, and where did you connect it to the weather board?
Chris @ BCR
Hey Louis,
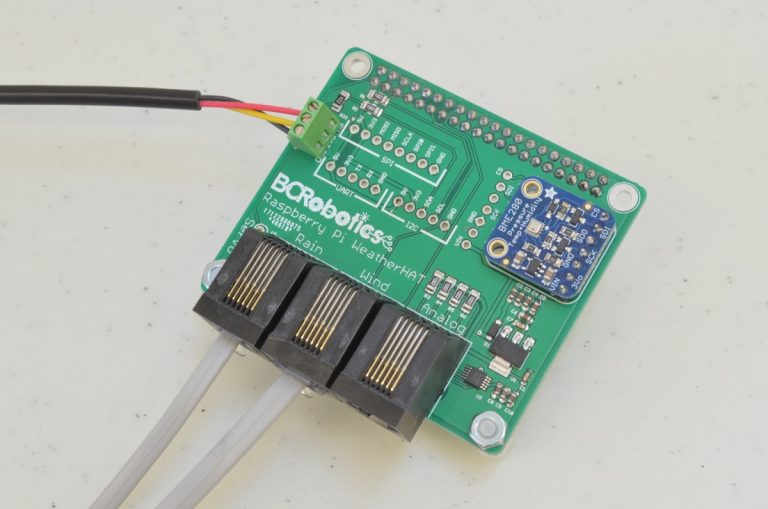
The light sensor is a bit of an experiment right now (it has actually stopped working correctly and i haven’t had a chance to get out there and repair it). The ADC chip on the Weather Board has 3 extra ADC inputs that are set up for resistive sensors (so CDS photocells, thermistors, etc.) I have a CDS photocell on there just for fun, but during one of our very heavy rainfalls, the water managed to damage the CDS – so now we are measuring an average resistance between rust and the light level…
From left to right (looking down on the “Analog” connector):
Pin 1 & 2: Channel 2
Pin 3 & 4: Channel 3
Pin 5 & 6: Channel 4
Pins 1,3,5 are GND pins, 2,4,6 are tied to 3.3V through 10K resistors and their respective ADC input. The voltage divider aspect can be removed, and these can be used as straight analog inputs as well.
Channel 2: Remove R4
Channel 3: Remove R5
Channel 4: Remove R6
Louis De Lange
Chris, thank you for the detailed response – I have to get my station up and working first before I will worry about a solar sensor, but this gives me what I need to look for in a sensor.
One question – the analog connector has 6 pins, or 3 sets. Does that mean 1 channel in the ADC is simply not connected? And if I add another analog channel while I have a wind direction sensor connected then I will have to combine two sensors into one connector to plug into that analog connector on the board?
Chris @ BCR
Hi Louis,
The one missing ADC channel is used for Wind Direction, it is routed through the “Wind” connector – simply plug that one in and it will work, no need to mess around with wiring!
Chris @ BCR
Those are done through plugins (just like the gauges) – instead of the complex gauge, you can use the same data call to collect it and print values, modify them, etc In this case it just prints using text.
stefan
Very nice project.
Is it possible to integrate a dust sensor (SDS011) in the weather station?
Here I have already found a way the measurement data on the Raspberry
read.
https://hackernoon.com/how-to-measure-particulate-matter-with-a-raspberry-pi-75faa470ec35
Chris @ BCR
Yes, it is possible – depending on your programming experience, it may be easier to modify their code to send to ThingSpeak after every read and just combine them at the ThingSpeak channel level. ThinkSpeak will tolerate multiple programs sending to the same channel.
Louis De Lange
Thank you for a wonderfully detailed tutorial. And the weatherboard is really well thought out, I can definitely recommend it for BYO enthusiasts
I completed the install of my new station based on this tutorial, and modified the uploader code so that it uploads to my own server running weewx, an experimental weather software system written in Python.
Website hosted at this link peachlandweather.ca/mystation
I am generally very impressed with the accuracy of the sensors, it tracks my Davis Vantage Pro very closely.
The only comment I have re. accuracy relates to the mounting of the combined temp/humidity/pressure sensor on the weatherboard and enclosing it in a box as shown. Pressure is right on the mark, but humidity is off by 5% – this is because the temperature in the outdoor box is about 2.5 degrees above the true outdoor temperature. I used a much larger box than the tutorial, with the same 3D printed louver – perhaps this is part of the problem. At this stage I am considering putting the humidity sensor on a remote connection in the same stevenson screen as the main temp sensor, or perhaps putting the entire assembly in a large stevenson screen.
Chris @ BCR
Hi Louis,
Thanks for the comments and the recommendation! I agree with the thoughts on the Humidity sensor – the challenge with that sensor is keeping it out of the elements, but as exposed as possible. With the large louvers, i opted to go the route of using a small 12V fan to cycle air through the enclosure which seemed to bring it inline with the environment outside. Since the fan size wasn’t too large relative to the opening, and it was drawing the air through, there was no change to the pressure reading. Moving the sensor outside the enclosure is always an option as well!
George
Hi Louis,
I’m trying to do the same think (RPi + weewx).
Do you have any links to the code you used or a general description of your software setup?
Thank in advance!
Raymond DuDevoir
Louis,
Would you be willing to share your Weewx code?
Thanks
Ray
Gareth
Hi,
The hardware and software are working. Thanks so much for all your help and this awesome tutorial! 🙂
I have a question regarding the Raspberry Pi Power + RTC HAT. How does this fit with everything else? The weather board won’t go on this, right? Any assistance here would be great.
Chris @ BCR
Hi Gareth,
You can stack the weatherboard over the Power RTC HAT or the Power HAT – you would need a tall stacking header on the power board and a tall header on the weatherboard to get the needed clearance
Gareth David Griffiths
Brilliant. Thank you! And this would all still fit in the box?
Gareth
Great. Thanks! What battery would you recommend?
Chuck Harding
How do you get the DS18B20 Temperature Sensor to fit in the Stevenson Screen? I ordered one from one of the printers that advertised on Thingverse and the holes in it are way too small for the sensor to fit through. There were no assembly instructions supplied with the screen either.
Chris @ BCR
Hi Chuck,
We made one and it seemed to work… sounds like it was printed at the wrong scale. Best to send questions about that specific item to the company that printed it for you and the creator of the file.
Chuck Harding
Are you going to post any pictures of your completed station as you have mounted it? The more information about these types of details the better…
Chuck Harding
Well, I managed to get it put together. I bought some 6-32 threaded rod from Amazon and epoxied one end in the socket on the top cap. After the epoxy had set I then threaded all the middle pieces onto the rod then put it into the bracket. A flat washer and 6-32 nut completed the setup. I marked where the end of the rod would be nearly flush with the outer face of the nut and then used a screw cutoff tool and it is finished. http://tinyurl.com/y687kagm
Ronald Wayman
my setup works good, except that I get false rain indications.
seems like I am experiencing glitches that trigger the rain input.
Any info would be appreciated. it appears, to me, that it is power line related. I have switched over to a regulated 5vdc, 5 amp supply to power the Pi. I still get single “one pulse” false reading from the “rain sensor input”, at random times, although it appears, to me, that they occur when the oven, mircowave, stove, hair dryers, etc are used.
Any thoughts??
Ron
Chris @ BCR
Out of curiosity – how is the rain gauge mounted?
Ronald Wayman
Actually the rain gauge is not even plugged in to the cable from the Pi. If there is no cable connected to the “Rain” input, there are no false indications whatever, but if I connect the cable to the Rain input even without it being connected to the rain gauge, then the false readings occur as noted above, appears related to other household appliance use.
Chris @ BCR
The line should be sitting at 3.3V unless the reed switch in the rain gauge is closed (its normally open). A rainfall tick is only trigged on the falling edge on that input. Meaning, as it transitions from 3.3V down towards 0V. With nothing connected, the input should just sit at 3.3V as there is nothing to ground it out and pull it low. If you have an oscilloscope it would be interesting to see what is happening on the line. It is possible there may be an issue with that GPIO pin on your Pi – do you have another one you could test with?
lucas
What kind of connector would i need for a AM2315 with the WeatherBoard?
Jason
Thanks for the awesome write up!
Your current github BCRobotics.py shows support for weewx.
Would you consider writing a tutorial on how it works?
I’ve looked at the code, and it’s beyond me unfortunatley.
I am sure others would appreciate it as well!
Chris @ BCR
Hi Jason,
Thanks for the note! The weewx code was not written by us – nor is it maintained by us (it isn’t our GitHub account)
Jason
Huh, my bad!
For those interested in what I am talking about, it’s at github /David-Enst/
WeeWX-BCRobotics
Not leaving a hyperlink as I don’t know your policy. Easy to figure out for those who care…
Yash Mehta
I got the code working but it looks like this section isnt working (uploading data to web)
is there any modifications to
#Configure header / connection address
headers = {“Content-typZZe”: “application/x-www-form-urlencoded”,”Accept”: “text/plain”}
conn = http.client.HTTPConnection(“api.thingspeak.com:80”)
Kynan
Hi!
Do you have any tips for making this project solar-powered? I’d like to stick it on a greenhouse attached separately from the house
William @ BC Robotics
Making it solar powered could easily be a whole tutorial in itself 😊 For a stationary setup I would personally go with a car battery / trailer battery (Lead acid, 12V) because they are easy to charge and tend to do well outdoors with minimal protection (like in Cars / boats / etc.) and it is easy to run the Pi from a 12VDC source using any variation of our PowerHAT or a Step Down Regulator.
The basics of it would be:
– Calculate the daily power consumption (24 hours) of the weather station (Watts)
– Take that daily total number and divide by 2 or 3 and find a panel / panel array that meets that number.
Example:
6W / hour at 24 hours = 144W
144W / 3 = 48W
– So if you use a 50W panel it should have more than enough generating capabilities to completely replenish the 24 hours of previous consumption within 3-4 hours in decent conditions.
– You will need to size the panel based on the conditions as well. If 3-4 hours is not likely in the winter, a bigger panel will charge the system quicker (and generate more power in less than ideal conditions)
– A larger battery can be used to help cover the less than ideal conditions for short periods of time.
– If you are making your own panel array, be sure to factor in a charge controller to manage the battery. If you are using an off the shelf 12V compatible panel, many of these already have this built in.
Basically, the bigger the panel, the more “safe” the system will be (as it can charge faster), the bigger the battery you use, the longer it can go without meeting those ideal conditions. Just ensure you always have enough charging capacity.
Power HAT variations:
https://bc-robotics.com/shop/raspberry-pi-power-hat/
https://bc-robotics.com/shop/raspberry-pi-power-rtc-hat/
https://bc-robotics.com/shop/raspberry-pi-power-fan-hat/
Step Down Regulators:
https://bc-robotics.com/shop/5v-2-5a-step-down-regulator/
https://bc-robotics.com/shop/5v-5a-step-down-voltage-regulator/
mcowney
Do you know of any place where we can purchase a Stevenson Screen for the DS18B20? I saw one on Amazon by La Crosse Technologies, but can tell if the DS18B20 will fit, I have messaged them, but haven’t heard anything. We are building this weather station for our school as part of our IT project. Thanks for any help!
William @ BC Robotics
If you have access to a 3D Printer, we have used this one before: https://www.thingiverse.com/thing:2970799
Joseph Sherrill
Recently completed installation of our station with a Power HAT + Fan sandwiched in the middle of the SBC and Weather HAT. We are providing 12V input from a Recpro 110V converter. The weatherproof box is the one you guys sell. I printed a grill from your template, so the installation looks pretty much like the one in your tutorial. The tutorials are awesome, and with some additional help from Raspberry Pi Org project description, I would say we were pretty successful. We have quickly learned a couple of things that we would welcome your insights and advise on.
First, the BME280 temp (we soldered it directly onto the Weather HAT) is 15 to 20F higher than ambient temp from a ds18b20 6 inches away under a Stetson shield. This difference is closer to 15F on a cloudy day and the humidity reading is also about half of actual, so it seems to me we need to aerate the box better. I am thinking of putting a second grill on the backside of the box, (it is mounted on a standoff with about 4 inches clear space on the back), and maybe some holes on the bottom to improve circulation. If that is not enough, I have to move the BME280 out of this box. Can send pictures separately.
Second, about every 1-3 hours, we are getting a connection error (Errno-3). My knowledge and skills to debug this problem are being taxed. It seems to be some problem with DNS name resolution, but I am baffled at how that can be intermittent (hours apart while I am doing URL requests every 5 seconds). Have you encountered this? Poking at some other blogs to get help too.
Traceback (most recent call last):
File “/usr/lib/python3/dist-packages/urllib3/connection.py”, line 159, in _new_conn
(self._dns_host, self.port), self.timeout, **extra_kw)
File “/usr/lib/python3/dist-packages/urllib3/util/connection.py”, line 57, in create_connection
for res in socket.getaddrinfo(host, port, family, socket.SOCK_STREAM):
File “/usr/lib/python3.7/socket.py”, line 748, in getaddrinfo
for res in _socket.getaddrinfo(host, port, family, type, proto, flags):
socket.gaierror: [Errno -3] Temporary failure in name resolution
Chris @ BCR
Hey Joseph,
Congrats on getting it all up and running! We recommend using a small fan to draw air into the enclosure – as it will provide much better results. The temperature reading from the BME will always be high – we only use the BME temperature to provide a correction factor for the humidity reading. Since you have ambient air temperature from the DS18B20 and enclosure temperature / humidity from the BME, you can extrapolate a more accurate value of humidity in external air without exposing the sensor to the elements – https://www.lenntech.com/calculators/humidity/relative-humidity.htm
As for the connection error – we did have issues with ours as well, and it turned out that it was a case of the Pi’s WiFi Connection was dropping out intermittently due to the distance from the router. Might be worth trying an ethernet cable connection as a temporary test
Alex
Hello BC-Robotics Team!
A perferktes and wonderful tutorial – I used a Raspberry Pi 4, only had to install Phyton and Thermsensor manually otherwise everything the same!
Tomorrow the weather station goes into operation outside – I’m very happy!
One or two questions I still have:
– Don’t you have any problems with humidity? The boards don’t get wet but still damp due to the weather.
– How do you get the 24h min and max values displayed?
– Is there an alternative for the displays via Thingspeak? Would like to have a tablet or something in the apartment with the similar displays you linked…. Maybe you have a solution tutorial or something for me 🙂
Many greetings from Germany!
Chris @ BCR
Hello Alex – thanks for the great feedback!
– We have yet to have any issue with humidity and the BME even here in the temperate rainforest – several years running now.
– In Thinkspeak you can do data analysis and post the results to a channel
– Since Thingspeak is the data handler in this tutorial, it is somewhat limited in that regard. The individual channels can be displayed using inline frames on a self hosted webpage to create something similar to what we have. Beyond that you could query the datasets and design your own interface – but that would be a little more advanced!
Alex
Hi Chris,
– i was asking because Thingspeak is not displaying the rainfall corectly… i use the normal Display option on Thingspeak for 4 days with column and the daily sum option. When i open Thingspeak it shows me for a few second the right data and then it goes down. After the day where the rainfall was, it shows me nothing 🙁 – Is it because i am using the free version and not the pay version?
– the next problem what i have is the bme280. It shows me all the time only values between 97 and 98 kPa and not more. Little bit strange, is there some option to calibrate this sensor?
But again – a top Tutorial! I like it!
Thanks again!
Alex
Alex
Here is the link for my Channel!
https://thingspeak.com/channels/1670111
Andrew
Hey,
is it possible to connect more temperature sensors via wifi?
And is this very complicated?
Thanks!
Norm Roy
I get error 404 when trying to open the 3D printed louvered cover for the box.
Do you have the code/ instructions for that?
William @ BC Robotics
Hi Roy – thanks for letting us know! On further inspection, it appears that file must have accidently been deleted from our server at some point. We will have a look through our backups and get it restored.