BC Robotics
Browse categories
- New Additions
- Shop
- On Sale / Clearance
- Popular Categories
- ArduinoArduino is the most popular open source microcontroller platform on the market. These easy to program devices can read sensors, control relays, light up LEDs, and even talk to one another. Their ability to interact with the real world by way of sensors and other electronics makes them ideal for automation such as watering a plant when it is dry, reading the weather, or controlling lights when it gets dark – the possibilities are endless. We carry a variety of Arduino compatible microcontrollers from several manufacturers, each with their own specific strengths and purposes. To further specialize your microcontroller, we carry a large selection of daughter boards (shields) which can add powerful sensors, GPS, or even LCD screens to your project! Just getting started with microcontrollers? We carry a variety of Arduino starter kits to get you reading sensors and blinking lights as easily as quickly as possible!
- BBC micro:bitThe BBC micro:bit is a pocket-sized computer designed for beginners in electronics and coding. The micro:bit makes getting into these often daunting fields as easy as possible. Programming the micro:bit V2 can be done by computer or by their intuitive app available for Android and iOS devices. Code can be designed using a drag and drop interface in the Blocks editor, Javascript, or Python.
- ESP8266 & ESP32The ESP8266 and ESP32 microcontrollers from Espressif are powerful, inexpensive, and feature integrated WiFi connectivity. These are ideal for IoT applications. We offer a variety of different ESP8266 and ESP32 modules for different skill levels.
- FeatherFeather is a flexible and powerful family of microcontroller main-boards (Feathers) and daughter-boards (Wings) designed with portability in mind. All Feathers have integrated battery connectors (and most have built in lipo chargers) The Feather form factor is not locked to a specific chipset or programming language. Feathers are available with a variety of chipsets and on-board features. Most Feathers and FeatherWings have example code and libraries written in Arduino C/C++ and CircuitPython.
- Makey MakeyThe Makey Makey kit is a electronics kit designed for beginners. It explores the concepts of creating circuits through everyday items. When plugged into a computer you can use the Makey Makey to make anything into a keyboard or mouse. No programming required! Projects like a Banana Drum Set, Cat Detector, Musical Stairs, and countless others are easier than you think! We carry the Makey Makey Classic Kit – a starter kit for the Makey Makey – along with extra alligator clips, copper conductive tape, and replacement cables.
- Raspberry PiThe Raspberry Pi was first introduced in early 2012 as a simple, low cost, computer fit onto a circuit board roughly the size of a credit card. The idea was to use this low cost computer to promote teaching of computer science in schools but it has grown to be so much more! Since its release, well over 30 million of these little computers have been sold. We have carried the Raspberry Pi in Canada since it first became available and have watched as the Pi has morphed into a complete development platform with powerful single-board computers, cameras, touchscreens, and other accessories. Its multitude of inputs and outputs for electronics and computer peripherals and its impressive computing power mean it can be used to make just about anything you can imagine. The newest and most powerful version, the Raspberry Pi 4, is now available!
- Popular Brands
- AdafruitAdafruit was founded in 2005 by MIT engineer, Limor “Ladyada” Fried. Her goal was to create the best place online for learning electronics and making the best designed products for makers of all ages and skill levels. In the last 10 years, Adafruit has grown to over 100+ employees in the heart of NYC with a 50,000+ sq ft. factory.
- ArduinoArduino is an ever growing platform used by some of the most popular microcontrollers out there. For many of us, this is where it all started – the Arduino was (and still is today) a pioneer when it comes to making programming hardware easy and accessible. We have one of the largest selections of Arduino and Arduino accessories in Canada. These range from basic Arduino Uno, to Cellular and WiFi connected devices perfect for the Internet of Things, and all the accessories needed to get them running!
- Micro:bitMicro:bit Educational Foundation are the manufacturers of the popular BBC micro:bit; a pocket-sized computer designed for beginners in electronics and coding. The micro:bit makes getting into these often daunting fields as easy as possible. Programming the micro:bit V2 can be done by computer or by their intuitive app available for Android and iOS devices. Code can be designed using a drag and drop interface in the Blocks editor, Javascript, or Python.
- BC RoboticsIn addition to stocking 2000+ unique items, we also manufacture our own accessories right here at BC Robotics. In 2014 we began developing our own widgets and add-ons for Arduino, Raspberry Pi, and general prototyping. This has now grown to over 80 different SKUs. Our boards are assembled in-house with top quality components. Many feature detailed tutorials or project guides to get you up and running as quickly as possible!
- Raspberry Pi
- SparkFunSince 2003, SparkFun has been helping turn ideas into reality – whether you’re creating a smart weather station, exploring the frontier of machine learning, building a robot for school or prototyping your first (or tenth) product. No matter your vision or skill level, our open source components, resources and online tutorials are designed to broaden access to innovative technology and make the road to a finished project shorter. We’re here to help you start something.
- Frequently Asked Questions
- My Account
- Wishlist
- Cart
Free Shipping - US & Canada @ $150 CAD
Sending An Email Using Python On The Raspberry Pi
PRODUCT TUTORIAL
- Chris @ BCR
- August 15, 2019
- 6:00 pm
- 38 Comments
Wouldn’t it be nice if your project could email you when it is done a task, has a problem, or just randomly thought the day? Well, with the Raspberry Pi, this is something that can be easily set up with a little Python code and an extra Gmail account. In this tutorial we will go through the steps of setting up a chunk of code that can be easily configured to send an email on command in any Python project!
There are a lot of different operating systems out there for the Raspberry Pi, so we are going to focus on the most popular: Raspbian. We are using the version dated: 2019-7-10 (Pi 4 Compatible) available from the Raspberry Pi Foundations’ Download Page. You don’t need to use the Raspberry Pi 4, any Raspberry Pi will do. However, deviating from the recommended operating system version may result in different / additional steps so if you are very new to this, we recommend following the tutorial exactly.
Requirements:

This tutorial requires several items:
- A Raspberry Pi
- 1 x microSD card with Raspbian Buster installed (2019-7-10)
- 1 x Power Supply for Pi4 or Pi 3B+ & Earlier
- A USB Keyboard & Mouse
- A HDMI compatible monitor
- Internet access
0%
Step 1 - Get Everything Prepared
In this short tutorial, we are going to get started with the assumption that you have already set up your Raspberry Pi, installed Raspbian, and have your Python3 editor of choice open and ready to go.
10%
Step 2 - How it works
Sending an email with the Pi using Python isn’t that difficult. We are going to create the email content in code and use an external email provider to act as the mail server send the email. Because we are using code to generate the email, we can dynamically create the content we send based on sensor readings, time of day, or just about anything else you can imagine! In this example we are going to use Google / Gmail to provide email services. We will create a Gmail account specifically for this device and give the Pi permission to send with this account.
20%
Step 3 – Create a Gmail Account
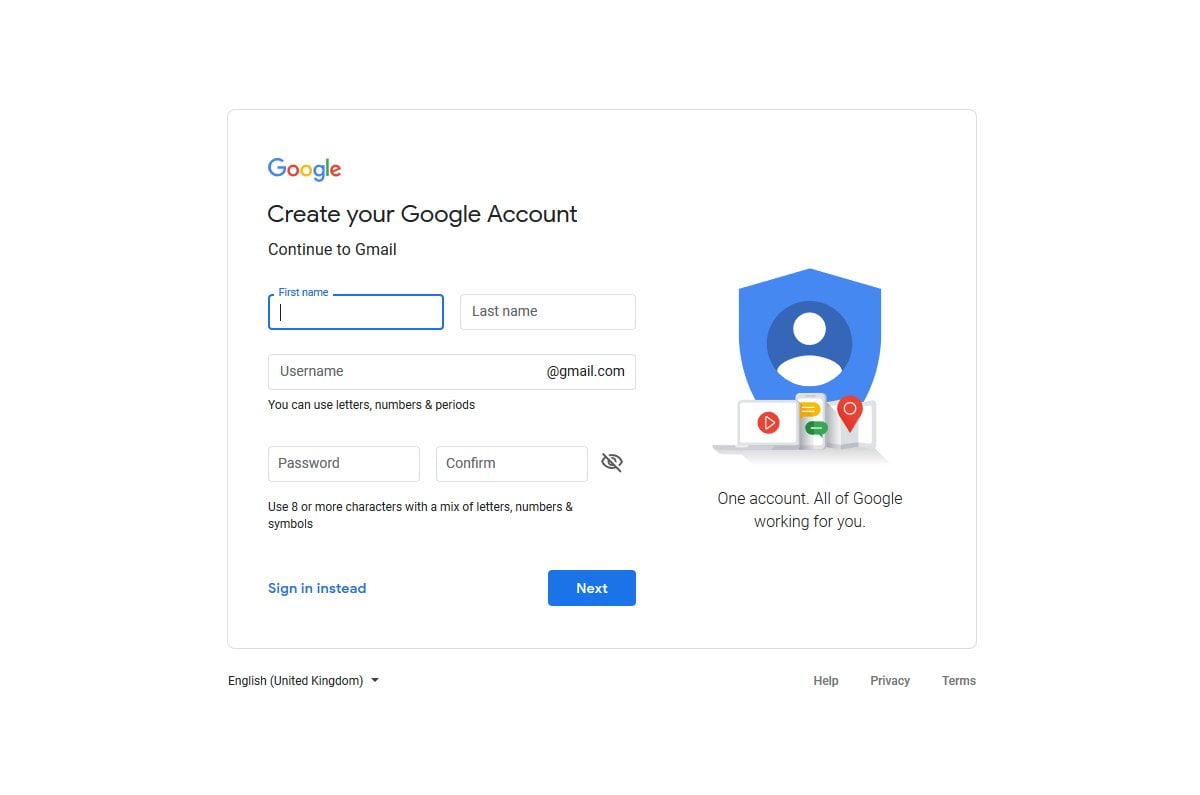
Head on over to Gmail and create a new email account. You may need to sign out if you are already logged in with an existing account. Once that is completed – move on to step 4!
30%
Step 4 – Set Gmail Permissions
Updated June 2022:
Due to changes in the way Google handles app permissions, this section has been updated to reflect the new method using specific app passwords.
To allow a device to use your Gmail account you will need to have 2-factor authentication enabled. This can be done through your Google Account under the Security tab – https://myaccount.google.com/security .
Once logged in, enable 2-Step Verification (if it is not already enabled).
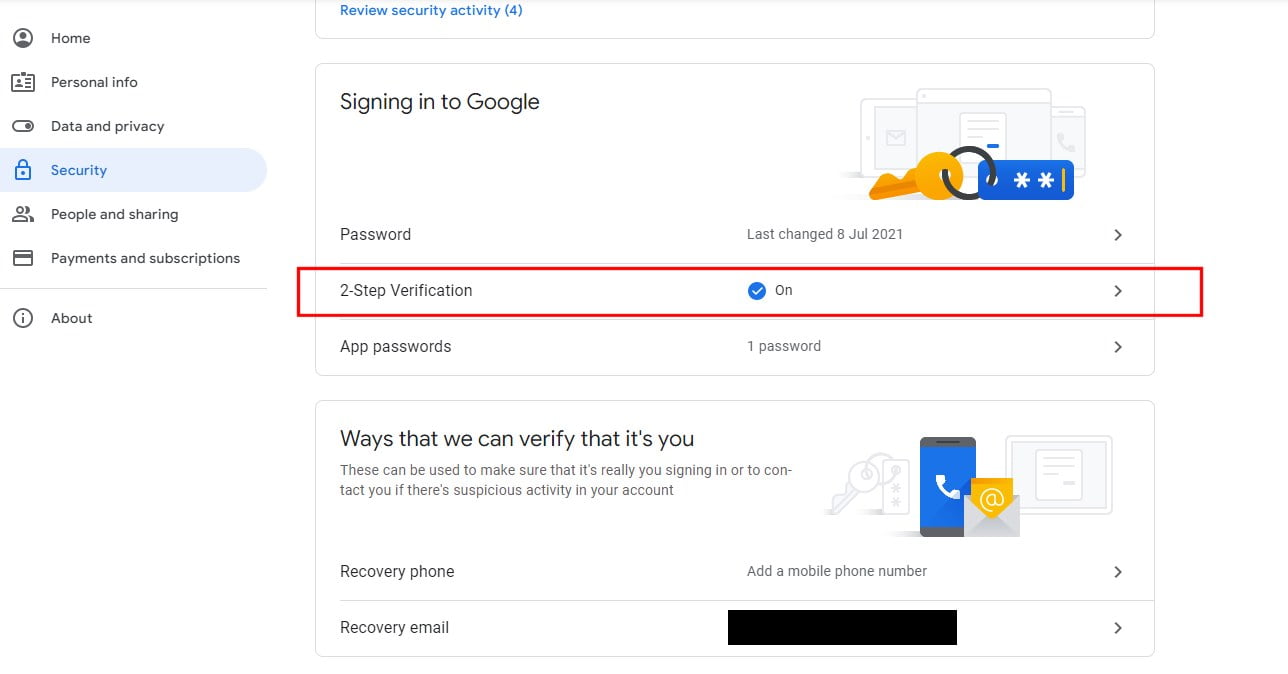
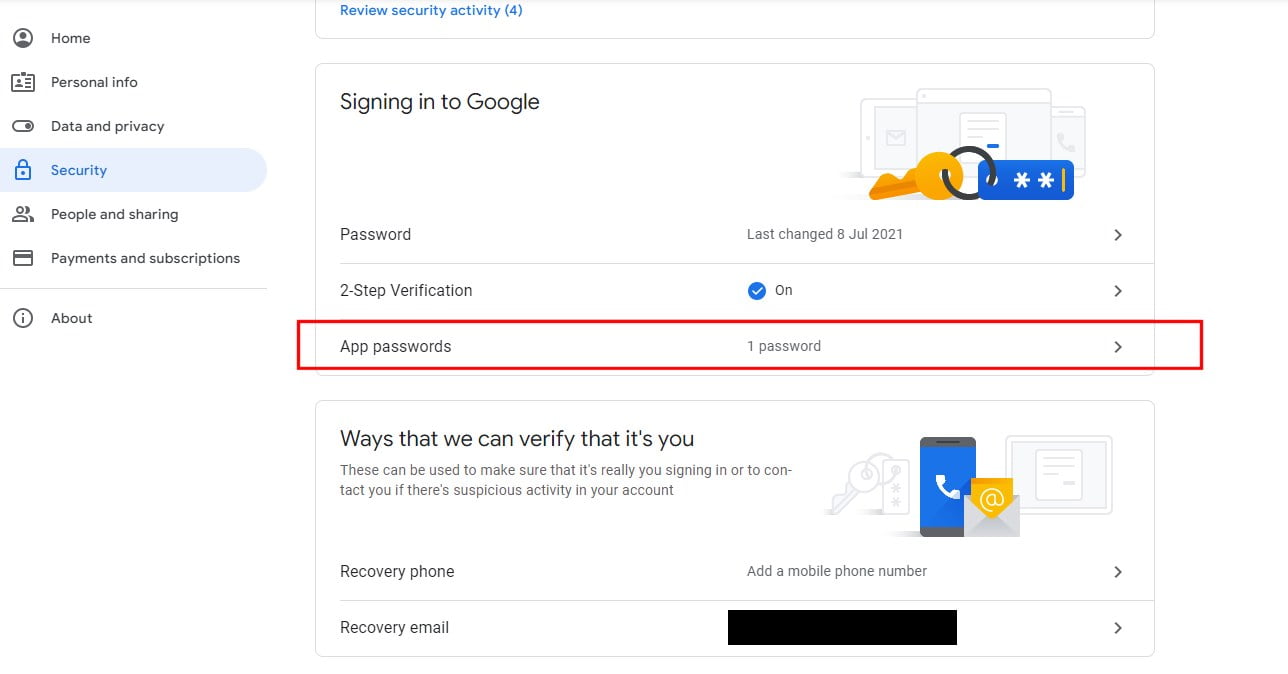
Once 2-Step Authentication is enabled, we can create an App Password specific to the Raspberry Pi we are sending emails from. This ensures the account password / Gmail password does not need to be stored in plain text in your code, just a device specific password.
Click on “App Passwords”
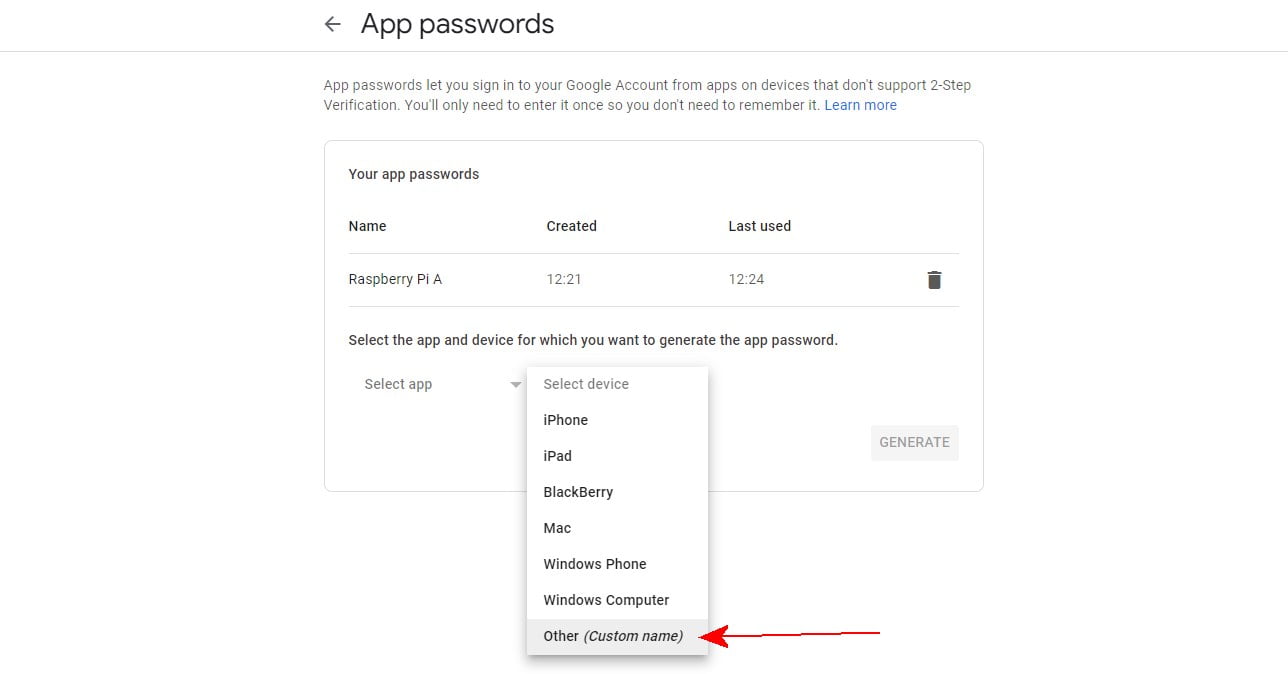
In the App Passwords screen, click the “Select Device” dropdown, and select “Other”
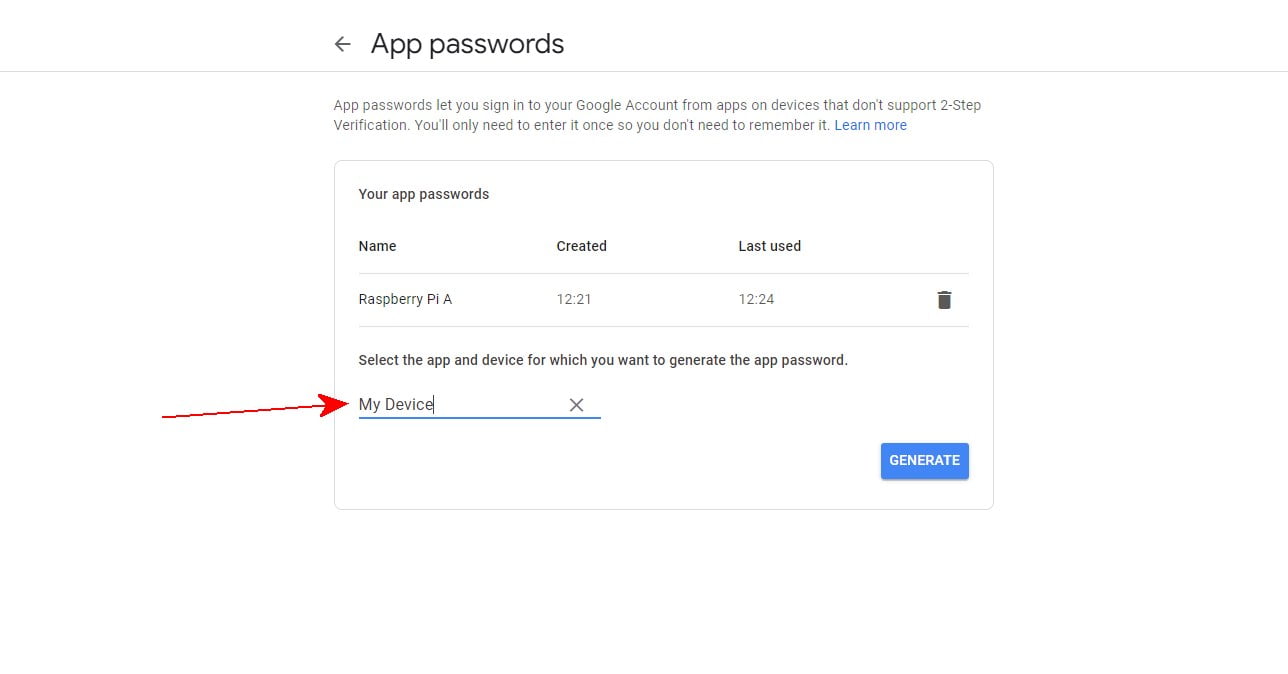
In the text box that appears, name your device. This name is just for your reference, so make it something meaningful. Once that is done, click “Generate” to create the App Password.
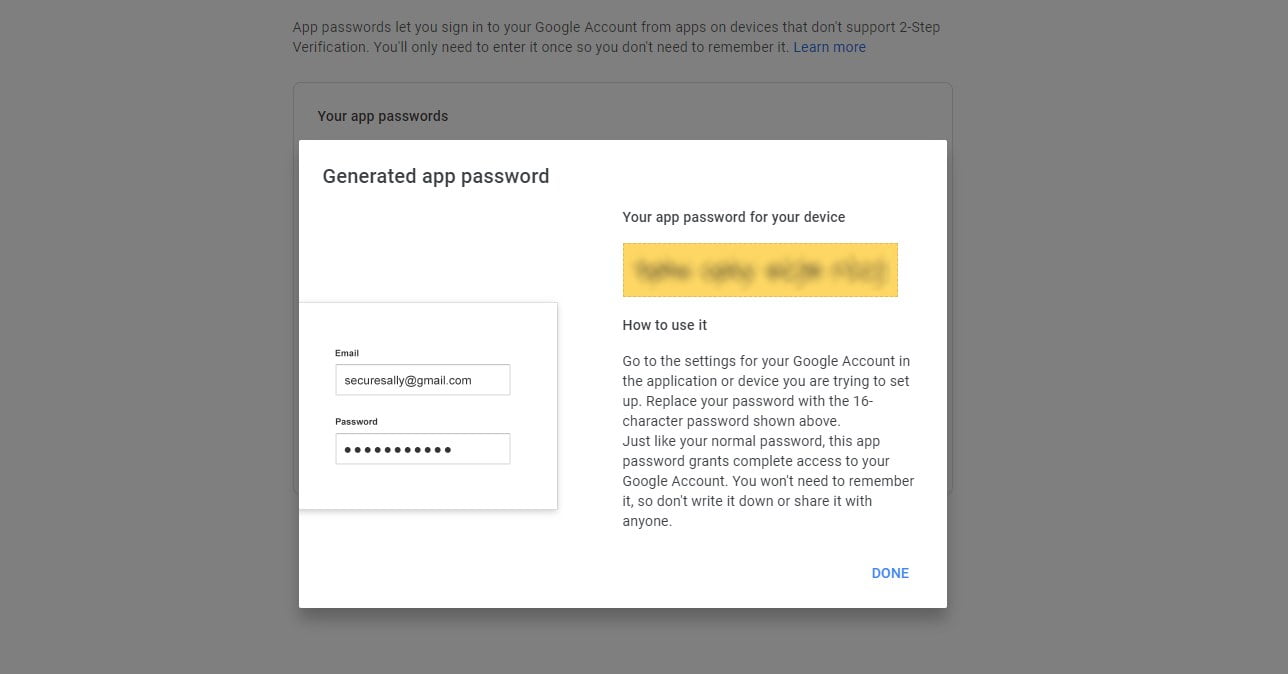
Copy the password that appears – and paste it somewhere temporary while we get the code organized. This is going to be used as your Gmail Password when connecting from this device.
40%
Step 5 – Coding
With Gmail set up, we are now going to write some basic code. The idea is that this code can be cut and pasted into a project without much need to modify it. We will start with the defining the server connection information and then move on to writing the sender. The sender will take dynamically generated information and use that for the subject line and content of the email. Time to open your favorite Python editor!
50%
Step 6 – SMTP Library
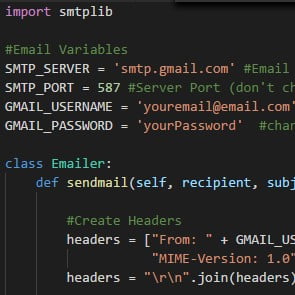
import smtplib
First we are going to start by adding in the smtp library reference. This gives us the email tools we are going to need.
60%
Step 7 – Email Variables
					import smtplib

#Email Variables
SMTP_SERVER = 'smtp.gmail.com' #Email Server (don't change!)
SMTP_PORT = 587 #Server Port (don't change!)
GMAIL_USERNAME = 'youremail@email.com' #change this to match your gmail account
GMAIL_PASSWORD = 'yourPassword' #change this to match your gmail app-password
We need to store a bunch of information for sending out emails as well. The SMTP Server and SMTP port are not going to change, but be sure to update the email address and password in your code to match the credentials for the Gmail account you created earlier.
70%
Step 8 – Email Sender
					import smtplib

#Email Variables
SMTP_SERVER = 'smtp.gmail.com' #Email Server (don't change!)
SMTP_PORT = 587 #Server Port (don't change!)
GMAIL_USERNAME = 'youremail@email.com' #change this to match your gmail account
GMAIL_PASSWORD = 'yourPassword' #change this to match your gmail app-password

class Emailer:
    def sendmail(self, recipient, subject, content):

    #Create Headers
    headers = ["From: " + GMAIL_USERNAME, "Subject: " + subject, "To: " + recipient,
        "MIME-Version: 1.0", "Content-Type: text/html"]
    headers = "\r\n".join(headers)

    #Connect to Gmail Server
    session = smtplib.SMTP(SMTP_SERVER, SMTP_PORT)
    session.ehlo()
    session.starttls()
    session.ehlo()

    #Login to Gmail
    session.login(GMAIL_USERNAME, GMAIL_PASSWORD)

    #Send Email & Exit
    session.sendmail(GMAIL_USERNAME, recipient, headers + "\r\n\r\n" + content)
    session.quit

sender = Emailer()
Next, we are going to write the chunk of code that actually sends the email. This creates the email, formats it correctly, creates the connection to Gmail, logs in, and sends the email. It is quite a few lines of code so we are going to put it into a custom Class – that way we can write this code once, but call it any time we want to send an email in our program. There isn’t anything to modify in this section of code so just copy it exactly.
80%
Step 9 – Email Contents
					import smtplib

#Email Variables
SMTP_SERVER = 'smtp.gmail.com' #Email Server (don't change!)
SMTP_PORT = 587 #Server Port (don't change!)
GMAIL_USERNAME = 'youremail@email.com' #change this to match your gmail account
GMAIL_PASSWORD = 'yourPassword'  #change this to match your gmail app-password

class Emailer:
    def sendmail(self, recipient, subject, content):

        #Create Headers
        headers = ["From: " + GMAIL_USERNAME, "Subject: " + subject, "To: " + recipient,
                   "MIME-Version: 1.0", "Content-Type: text/html"]
        headers = "\r\n".join(headers)

        #Connect to Gmail Server
        session = smtplib.SMTP(SMTP_SERVER, SMTP_PORT)
        session.ehlo()
        session.starttls()
        session.ehlo()

        #Login to Gmail
        session.login(GMAIL_USERNAME, GMAIL_PASSWORD)

        #Send Email & Exit
        session.sendmail(GMAIL_USERNAME, recipient, headers + "\r\n\r\n" + content)
        session.quit

sender = Emailer()

sendTo = 'anotheremail@email.com'
emailSubject = "Hello World"
emailContent = "This is a test of my Emailer Class"
The Class we wrote in the last step sends out the email. The class takes three arguments (pieces of information we specify when we use the code to send an email) and constructs the email before sending. These three external components are the recipient of the email, a subject line for the email, and the text you want to have in the body of the email. These three pieces of information are stored in three variables (sendTo, emailSubject, and emailContent). This way, our code is capable of sending emails to different people, with different subject lines, and different email content without having to write a different sender for each new contact / email message. Add the three variables and be sure to set the recipient to somewhere you want to receive your first test email.
90%
Step 10 – Calling the Email Class
					import smtplib

#Email Variables
SMTP_SERVER = 'smtp.gmail.com' #Email Server (don't change!)
SMTP_PORT = 587 #Server Port (don't change!)
GMAIL_USERNAME = 'youremail@email.com' #change this to match your gmail account
GMAIL_PASSWORD = 'yourPassword'  #change this to match your gmail app-password

class Emailer:
    def sendmail(self, recipient, subject, content):

        #Create Headers
        headers = ["From: " + GMAIL_USERNAME, "Subject: " + subject, "To: " + recipient,
                   "MIME-Version: 1.0", "Content-Type: text/html"]
        headers = "\r\n".join(headers)

        #Connect to Gmail Server
        session = smtplib.SMTP(SMTP_SERVER, SMTP_PORT)
        session.ehlo()
        session.starttls()
        session.ehlo()

        #Login to Gmail
        session.login(GMAIL_USERNAME, GMAIL_PASSWORD)

        #Send Email & Exit
        session.sendmail(GMAIL_USERNAME, recipient, headers + "\r\n\r\n" + content)
        session.quit

sender = Emailer()

sendTo = 'anotheremail@email.com'
emailSubject = "Hello World"
emailContent = "This is a test of my Emailer Class"

#Sends an email to the "sendTo" address with the specified "emailSubject" as the subject and "emailContent" as the email content.
sender.sendmail(sendTo, emailSubject, emailContent)
Now that we have everything set up – sending an email is as simple as calling the Emailer Class with the three arguments (sendTo, emailSubject, and emailContent). It will then create and send the email based on those parameters.
Run this code by hitting “F5” on the keyboard, an email should be received at the receiving address a moment later – as simple as that. Going forwards, you can copy and paste this code into a Python 3 project to provide email sending capabilities with ease!
100%
An Example: Email on Button Press
					import smtplib
import RPi.GPIO as GPIO
import time

#Email Variables
SMTP_SERVER = 'smtp.gmail.com' #Email Server (don't change!)
SMTP_PORT = 587 #Server Port (don't change!)
GMAIL_USERNAME = 'youremail@email.com' #change this to match your gmail account
GMAIL_PASSWORD = 'yourPassword'  #change this to match your gmail app-password

#Set GPIO pins to use BCM pin numbers
GPIO.setmode(GPIO.BCM)

#Set digital pin 17(BCM) to an input
GPIO.setup(17, GPIO.IN)

#Set digital pin 17(BCM) to an input and enable the pullup
GPIO.setup(17, GPIO.IN, pull_up_down=GPIO.PUD_UP)

#Event to detect button press
GPIO.add_event_detect(17, GPIO.FALLING)


class Emailer:
    def sendmail(self, recipient, subject, content):

        #Create Headers
        headers = ["From: " + GMAIL_USERNAME, "Subject: " + subject, "To: " + recipient,
                   "MIME-Version: 1.0", "Content-Type: text/html"]
        headers = "\r\n".join(headers)

        #Connect to Gmail Server
        session = smtplib.SMTP(SMTP_SERVER, SMTP_PORT)
        session.ehlo()
        session.starttls()
        session.ehlo()

        #Login to Gmail
        session.login(GMAIL_USERNAME, GMAIL_PASSWORD)

        #Send Email & Exit
        session.sendmail(GMAIL_USERNAME, recipient, headers + "\r\n\r\n" + content)
        session.quit

sender = Emailer()

while True:
    if GPIO.event_detected(17):
        sendTo = 'anotheremail@email.com'
        emailSubject = "Button Press Detected!"
        emailContent = "The button has been pressed at: " + time.ctime()
        sender.sendmail(sendTo, emailSubject, emailContent)
        print("Email Sent")

    time.sleep(0.1)
Here is a quick example of this code being used to send an email anytime a button is pressed. To try it out, connect a momentary button to GPIO 17 and GND. You will also need to change your Gmail Sender Email and app-password, along with the recipient at the bottom.
Once the email and password fields are updated, run this code by hitting “F5” on the keyboard. When the button is depressed, an email should be received at the receiving address a moment later with the time the button was pressed.
38 thoughts on “Sending An Email Using Python On The Raspberry Pi”
Santhosh
hello,
hope you are doing good.i have gone through the your blog ,it was very informative and it works great.thanks for sharing your knowledge.
i have a question for you.
how to send attachments using pi
BrianT
Been using this Python script for almost 2 years now in multiple scenarios. However, just read the following disappointing Google Gmail news!
“Less secure apps & your Google Gmail Account
To help keep your account secure, starting May 30, 2022, Google will no longer support the use of third-party apps or devices which ask you to sign in to your Google Account using only your username and password.”
Does anyone know of a workaround for continuing to use Gmail?
Chris @ BCR
Yeah it is really disappointing – we are currently looking for an alternative
BrianT
CHRIS @ BCR
Found the fix and it works!
1. Need to turn on 2-factor authentication for your Gmail account.
2. Create Gmail Third party App password for that account.
3. Paste new generated 16 character password where original Gmail password is.
See YouTube video for dealing with copiers that Scan to email. Same issue. Followed instructions on video for configuring Gmail correctly.
YouTube video:https://youtu.be/M0wSV86Q_9M
Chris @ BCR
Great find – gonna have to test that out!
Rob Cranfill
Very nice, thanks! I have a Pi running various home automation tasks (using Home Assistant) and a few other server-y things; being able to email status reports out will be very useful.
Trent
hi there, great tutorial, easy to follow and attempt.
when I tried to run the script @1028 on 06-05-2020 I receive the following
Traceback (most recent call last):
File “/home/pi/code/startup_mailer_3.py”, line 37, in
sender.sendmail(sendTo, emailSubject, emailContent)
File “/home/pi/code/startup_mailer_3.py”, line 24, in sendmail
session.login(GMAIL_USERNAME, GMAIL_PASSWORD)
File “/usr/lib/python3.7/smtplib.py”, line 730, in login
raise last_exception
File “/usr/lib/python3.7/smtplib.py”, line 721, in login
initial_response_ok=initial_response_ok)
File “/usr/lib/python3.7/smtplib.py”, line 642, in auth
raise SMTPAuthenticationError(code, resp)
smtplib.SMTPAuthenticationError: (535, b’5.7.8 Username and Password not accepted. Learn more at\n5.7.8 https://support.google.com/mail/?p=BadCredentials k12sm2343513pfp.158 – gsmtp’)
Chris @ BCR
Double check you have done Step 4 and enabled less secure apps – that is normally what causes this error
Nils
Thanks for this great tutorial. Just what I need to complete my weather station.
I have a RPi with a BME280 sensor reading temp,humidity and air pressure using a small Python program. How can I integrate this little weather sensor with the mail sending program ?
Can I copy/paste the weather sensor program into the mail sender or should it be in it’s own file ? I want to send data via mail every hour.
regards,
Nils
Jim Clevenstine
I’ve never used a Raspberry Pi before and I’m considering a project, but would like to know if it’s reasonable for a Raspberry Pi. It involves sending email so your tutorial is great! As background, I have a small engineering consulting business. I created a commitment tracking system (MS Access) to track my open tasks for my clients. I can set up my tracking system to automatically generate a pdf report for each client showing the status of each commitment. I’d like to automatically sent that commitment status report to each client (email) each week. I can set up MS Access to automatically generate an email to each client, but the security provision in Windows 10 require me to acknowledge each email as it goes out. I want the emails to be truly automatic, so I’m wondering about using Raspberry Pi. I can have my Access database generate the pdf reports and store them somewhere in my LAN. I can have the Access database export a file (Excel, CSV) containing the email information; each client would be a row and that row would contain the To Address, CC Addresses, Subject, Body, and PDF report filename. Can I set up Raspberry Pi to automatically (2:am Monday mornings) generate and send an email, with the PDF attachment, to each client? I certainly don’t expect you to tell me how, but I’d like to know I’m chasing down a path that should have a good ending. Can you suggest a good beginner’s book for Raspberry Pi, one that might touch on the topics I’ll need for this task? I have experience with Arduino but suspect this will be a stretch for Arduino. Thank you.
Chris @ BCR
Hi Jim,
I don’t think you are too far off base with the idea. Ideally you would just set up the Pi as the network save location. The script would need to open the CSV file, parse through, and send each email with the attachment. You can probably use our Sending An Email With Attached Photo tutorial to get the email sending portion figured out. Pulling the data from a CSV is probably very well documented in Python so that shouldn’t be too difficult to work in.
The scheduling is actually the easiest part – a CRON job on the Pi should solve that – which we have a tutorial on as well
Books – I couldn’t make a recommendation myself, but definitely have a look at the Pi Foundation’s online guides.
Best of luck!
Jim Clevenstine
Thank you very much for your response and the suggestions! I’m anxious to start.
Jim
Dennis Douglas
Hi Jim:
As you suggest, I got a Google Mail address and verified it by sending messages to it from my Mac and sending mail to my Mac from the gmail address. I copied and pasted your code into my Pi/Python, changing the personal information (username & password) as you indicated, and used my regular email as the <'sendTo adress. It doesn't work. I received no email from the test message and there were no error messages. I DID change to Google thing to allow less secure usage, and I verified that my username and password were entered correctly. Where would you suggest that I start looking for a problem?
Chris @ BCR
The method definitely works – I have several devices mailing me every day using this code. Do you have the pushbutton hooked up correctly to trigger the event?
Eduard
Thanks for a great tutorial. I found the ‘cut and paste’ did not work very well as I received several errors on various lines with “Unidentified characters”. Retyping the lines manually fixed the problem. Success in sending email. Now to learn how to send the data I require from a log.txt file.
huckleberrry
from where do you import the smtplib because mine just says bash import command not found
Kelly Mayo
You must be inside python to run these commands. It sounds like you are at the command prompt. Use Thonny, under your Application Menu, under Programming, Thonny Python IDE.
Hope that helps
Mads
Excelent tutorial! This “just worked” 🙂
Thanks
Muhammad Rafie Sazali
Excelent tutorial,
Question:
how do i put numbers in the mail content,
example:
emailContent = “TIME RECORDED : ” (number)
is it like this?
Ola Dunk
Thanks. This tutorial worked the first time I tried it. Very impressive.
BrianT
Was so surprised (being a newbie) this project worked first time I tried it.
Only problem having; every time button is pressed, it’s sending 2 or 3 emails, instead of just 1. Tried using different switches, but seeing same issue.
Is there a way to deal with this switch bouncing?
Jorge Ramirez
Im triying to use time.sleep or playing with the while true, adding timmers, and change it to momentary button pressed.
Dan Fink
Extremely helpful for this beginner! I now have my weather station emailing me detailed reports daily.
Alsrulez
Hi im testing this out but I have run into a problem. Whenever I run it it says “Emailer is not defined” cant figure out what the problem is
Matt
@Alsrulez
Check that your code says “sendmail” and not “send(e)mail”; I had the same issue.
Andy
Thank you for the code you provided. It’s working fine.
But in my browser (Firefox or Chromium), I can’t see the necessary indentations in the code.
BrianT
Anyone know how to send to multiple email recipients?
sendTo = ‘janedoe@email.com’ , ‘johndoe@email.com’
or
sendTo = ‘janedoe@email.com , johndoe@email.com‘
or
sendTo = ‘janedoe@email.com ; johndoe@email.com‘
Doesn’t work…
Chris @ BCR
Hey Brian,
Does the email need to send as a single email with all of the contacts in the “To” address, or could multiple emails be sent (one to each in your list) one after another?
Cheers,
BrianT
Hi Chris,
Does the email need to send as a single email with all of the contacts in the “To” address?
No it does not.
Could multiple emails be sent (one to each in your list) one after another?
YES, absolutely!
Thank you for replying.
Chris @ BCR
You could encapsulate the send method within a for loop and use a list of email addresses:
addressList = ["johndoe@email.com", "janedoe@email.com"]for a in addressList:
sender.sendmail(a, emailSubject, emailContent)
not sure how gmail will react to the rapid fire emails, you may need a delay in there to slow it down
BrianT
Well…one way to find out, will try it.
Thanks Chris,
Pierre
This code works on Raspberry Pi 0 W with Raspbian 10 buster.
Thank you
Joe
Well explained, Simple and most importantly it works-First time!
After many attempts to send emails by python I finally found a program that works.
I was beginning to believe it wasn’t possible.
Thanks You very much!
Joe
David Flannery
I had this working for months using the app password for my gmail account. The last few days it got intermittent and then today it just doesn’t work at all. It’s failing at the smtplib.SMTP call. I’ve tried getting a fresh app password but that didn’t fix it. Has there been a change or problem with smtp.gmail.com ?
Chris @ BCR
Hi David,
I have a few systems running 24/7 and haven’t noticed any interruptions – leaning towards it being something local to your setup. Keep us posted!
Alan Malsher
Great explanation and it works!
But no explanation of how to send a CC or BCC copy.
Any suggestions?
Steve
Thought I was going to have to setup my own mail server but this works a treat, thanks!
Daniel Diana
This code works great, but I’m getting a lot of false inputs which in turn send me an email without the switch physically closing.
Does any one know why this would happen. I have even installed a pull up resistor to try and fix the problem with no success.
Look forward to any ideas you guys may have.