BC Robotics
Browse categories
- New Additions
- Shop
- On Sale / Clearance
- Popular Categories
- ArduinoArduino is the most popular open source microcontroller platform on the market. These easy to program devices can read sensors, control relays, light up LEDs, and even talk to one another. Their ability to interact with the real world by way of sensors and other electronics makes them ideal for automation such as watering a plant when it is dry, reading the weather, or controlling lights when it gets dark – the possibilities are endless. We carry a variety of Arduino compatible microcontrollers from several manufacturers, each with their own specific strengths and purposes. To further specialize your microcontroller, we carry a large selection of daughter boards (shields) which can add powerful sensors, GPS, or even LCD screens to your project! Just getting started with microcontrollers? We carry a variety of Arduino starter kits to get you reading sensors and blinking lights as easily as quickly as possible!
- BBC micro:bitThe BBC micro:bit is a pocket-sized computer designed for beginners in electronics and coding. The micro:bit makes getting into these often daunting fields as easy as possible. Programming the micro:bit V2 can be done by computer or by their intuitive app available for Android and iOS devices. Code can be designed using a drag and drop interface in the Blocks editor, Javascript, or Python.
- ESP8266 & ESP32The ESP8266 and ESP32 microcontrollers from Espressif are powerful, inexpensive, and feature integrated WiFi connectivity. These are ideal for IoT applications. We offer a variety of different ESP8266 and ESP32 modules for different skill levels.
- FeatherFeather is a flexible and powerful family of microcontroller main-boards (Feathers) and daughter-boards (Wings) designed with portability in mind. All Feathers have integrated battery connectors (and most have built in lipo chargers) The Feather form factor is not locked to a specific chipset or programming language. Feathers are available with a variety of chipsets and on-board features. Most Feathers and FeatherWings have example code and libraries written in Arduino C/C++ and CircuitPython.
- Makey MakeyThe Makey Makey kit is a electronics kit designed for beginners. It explores the concepts of creating circuits through everyday items. When plugged into a computer you can use the Makey Makey to make anything into a keyboard or mouse. No programming required! Projects like a Banana Drum Set, Cat Detector, Musical Stairs, and countless others are easier than you think! We carry the Makey Makey Classic Kit – a starter kit for the Makey Makey – along with extra alligator clips, copper conductive tape, and replacement cables.
- Raspberry PiThe Raspberry Pi was first introduced in early 2012 as a simple, low cost, computer fit onto a circuit board roughly the size of a credit card. The idea was to use this low cost computer to promote teaching of computer science in schools but it has grown to be so much more! Since its release, well over 30 million of these little computers have been sold. We have carried the Raspberry Pi in Canada since it first became available and have watched as the Pi has morphed into a complete development platform with powerful single-board computers, cameras, touchscreens, and other accessories. Its multitude of inputs and outputs for electronics and computer peripherals and its impressive computing power mean it can be used to make just about anything you can imagine. The newest and most powerful version, the Raspberry Pi 4, is now available!
- Popular Brands
- AdafruitAdafruit was founded in 2005 by MIT engineer, Limor “Ladyada” Fried. Her goal was to create the best place online for learning electronics and making the best designed products for makers of all ages and skill levels. In the last 10 years, Adafruit has grown to over 100+ employees in the heart of NYC with a 50,000+ sq ft. factory.
- ArduinoArduino is an ever growing platform used by some of the most popular microcontrollers out there. For many of us, this is where it all started – the Arduino was (and still is today) a pioneer when it comes to making programming hardware easy and accessible. We have one of the largest selections of Arduino and Arduino accessories in Canada. These range from basic Arduino Uno, to Cellular and WiFi connected devices perfect for the Internet of Things, and all the accessories needed to get them running!
- Micro:bitMicro:bit Educational Foundation are the manufacturers of the popular BBC micro:bit; a pocket-sized computer designed for beginners in electronics and coding. The micro:bit makes getting into these often daunting fields as easy as possible. Programming the micro:bit V2 can be done by computer or by their intuitive app available for Android and iOS devices. Code can be designed using a drag and drop interface in the Blocks editor, Javascript, or Python.
- BC RoboticsIn addition to stocking 2000+ unique items, we also manufacture our own accessories right here at BC Robotics. In 2014 we began developing our own widgets and add-ons for Arduino, Raspberry Pi, and general prototyping. This has now grown to over 80 different SKUs. Our boards are assembled in-house with top quality components. Many feature detailed tutorials or project guides to get you up and running as quickly as possible!
- Raspberry Pi
- SparkFunSince 2003, SparkFun has been helping turn ideas into reality – whether you’re creating a smart weather station, exploring the frontier of machine learning, building a robot for school or prototyping your first (or tenth) product. No matter your vision or skill level, our open source components, resources and online tutorials are designed to broaden access to innovative technology and make the road to a finished project shorter. We’re here to help you start something.
- Frequently Asked Questions
- My Account
- Wishlist
- Cart
Free Shipping - US & Canada @ $150 CAD
Using A TMP36 Temperature Sensor With Arduino
PRODUCT TUTORIAL
- Chris @ BCR
- July 7, 2015
- 4:10 pm
- 33 Comments
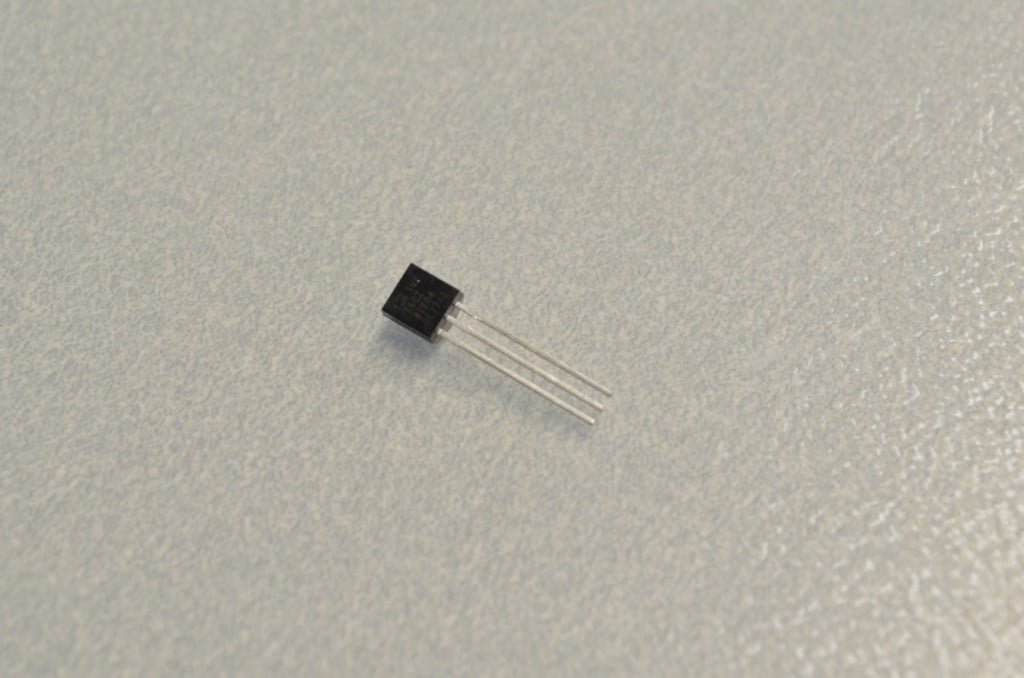
The TMP36 temperature sensor is an easy way to measure temperature using an Arduino! The sensor can measure a fairly wide range of temperature (-50°C to 125°C), is fairly precise (0.1°C resolution), and is very low cost, making it a popular choice. In this tutorial we will go over the basics of hooking the TMP36 up and writing some basic code to read the analog input it is connected to.
A Few Considerations:
Before we jump into getting this TMP36 temperature sensor hooked up there are a few points to consider:
• This sensor is not weatherproof, so it will need to be shielded from direct exposure to the elements.
How It Works:
Unlike a thermistor, the TMP36 does not have a temperature sensitive resistor. Instead this sensor uses the property of diodes; as a diode changes temperature the voltage changes with it at a known rate. The sensor measures the small change and outputs an analog voltage between 0 and 1.75VDC based on it. To get the temperature we just need to measure the output voltage and a little bit of math!
The Parts Needed:
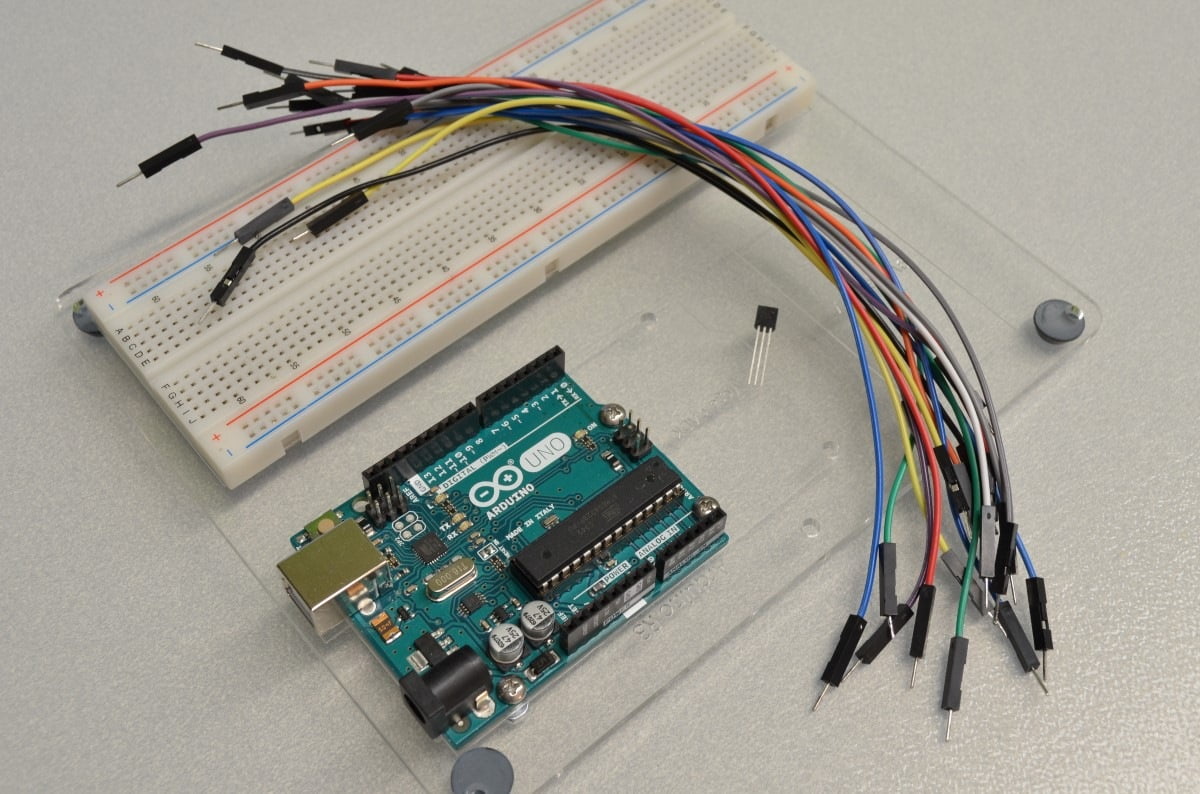
This tutorial will be requiring a few common parts:
- 1 x TMP36 Temperature Sensor
- 1 x Arduino Uno or compatible microcontroller
- Hookup Wires – We recommend Premium Male/Male Jumper Wire
- Mounting Plate (optional)
The Schematic
This handy little diagram shows how we will be connecting everything. Don’t worry if it looks a little overwhelming, we will be going through this step by step!
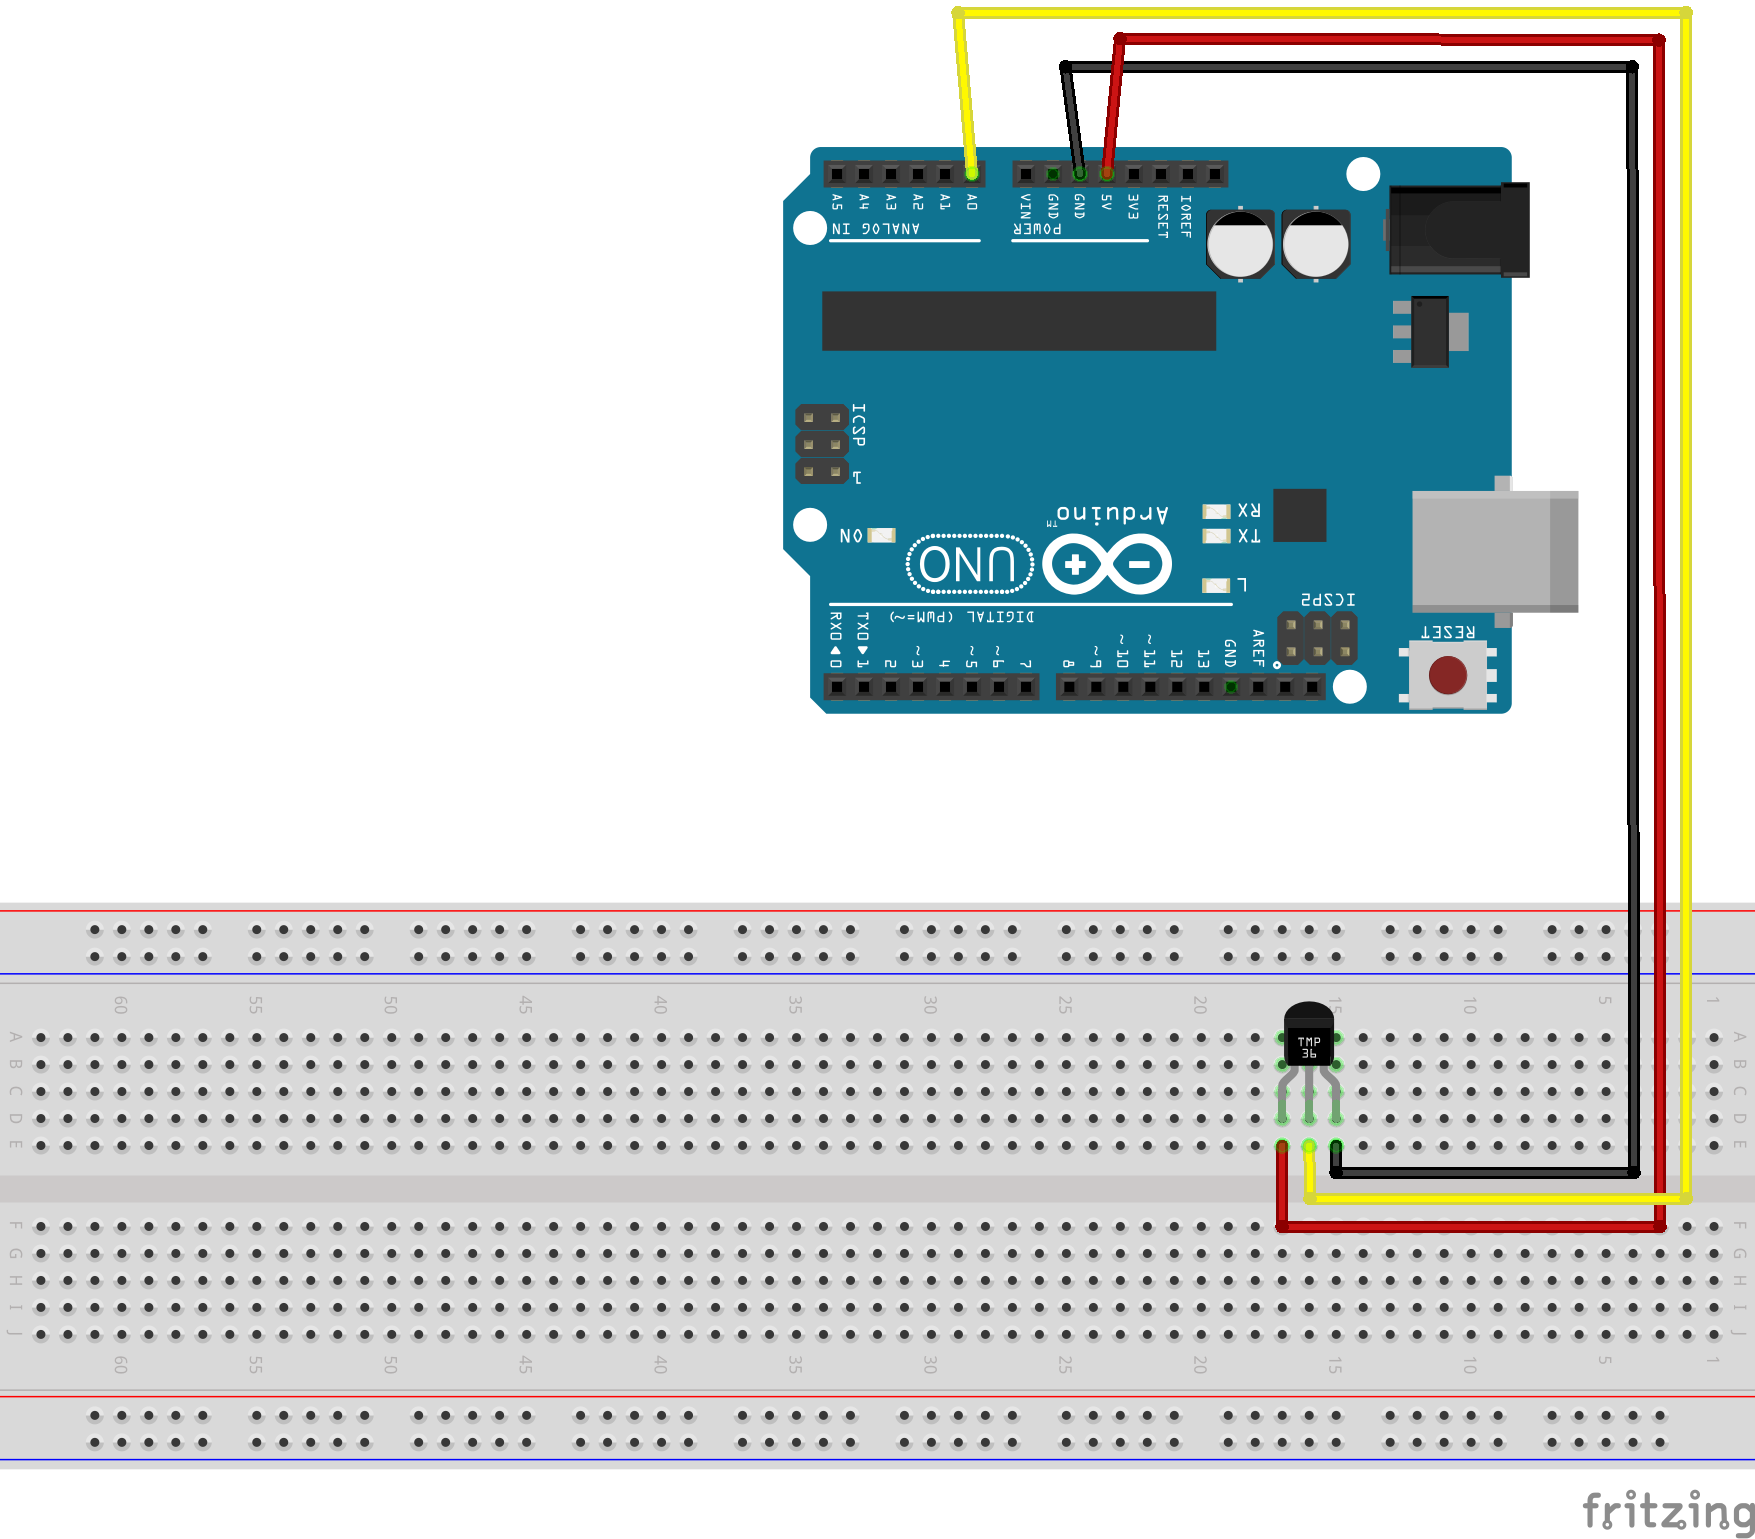
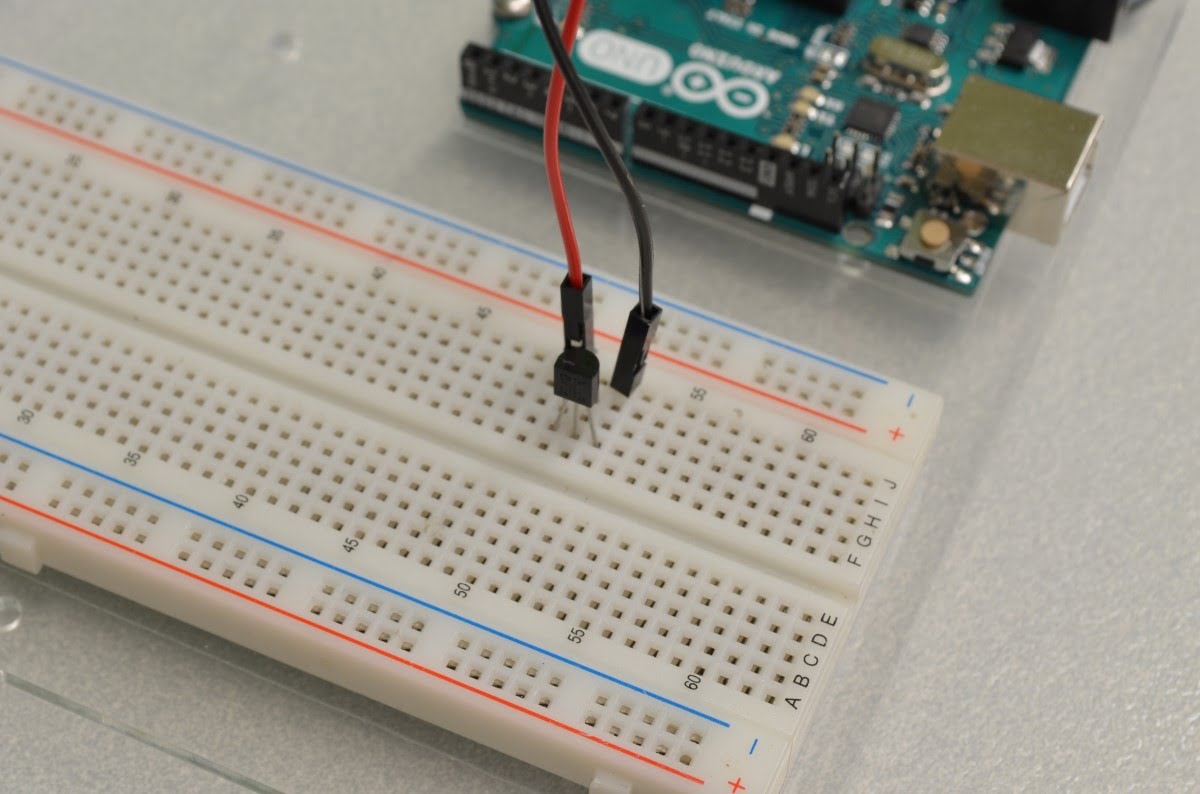
Step 1 – The TMP36 Temperature Sensor

Since this sensor is very simple and does not require any supporting components we will be directly connecting the sensor to the Arduino. Start by bending the legs on the TMP36 sensor so they will fit into the breadboard.
12.5%
Step 2 – Powering The Sensor
This sensor has a fairly wide input voltage, meaning it isn’t terribly picky about the voltage required (anywhere between 2.7VDC and 5.5VDC). We will use the Arduino’s 5VDC power for this tutorial. Start by connecting a jumper wire from the Arduino’s 5VDC pin and running it to the sensor’s “pin 1”. Next, run another jumper wire from one of the Arduino’s ground pins to the sensor’s “pin 3”
25%
Step 3 – Connecting The Output
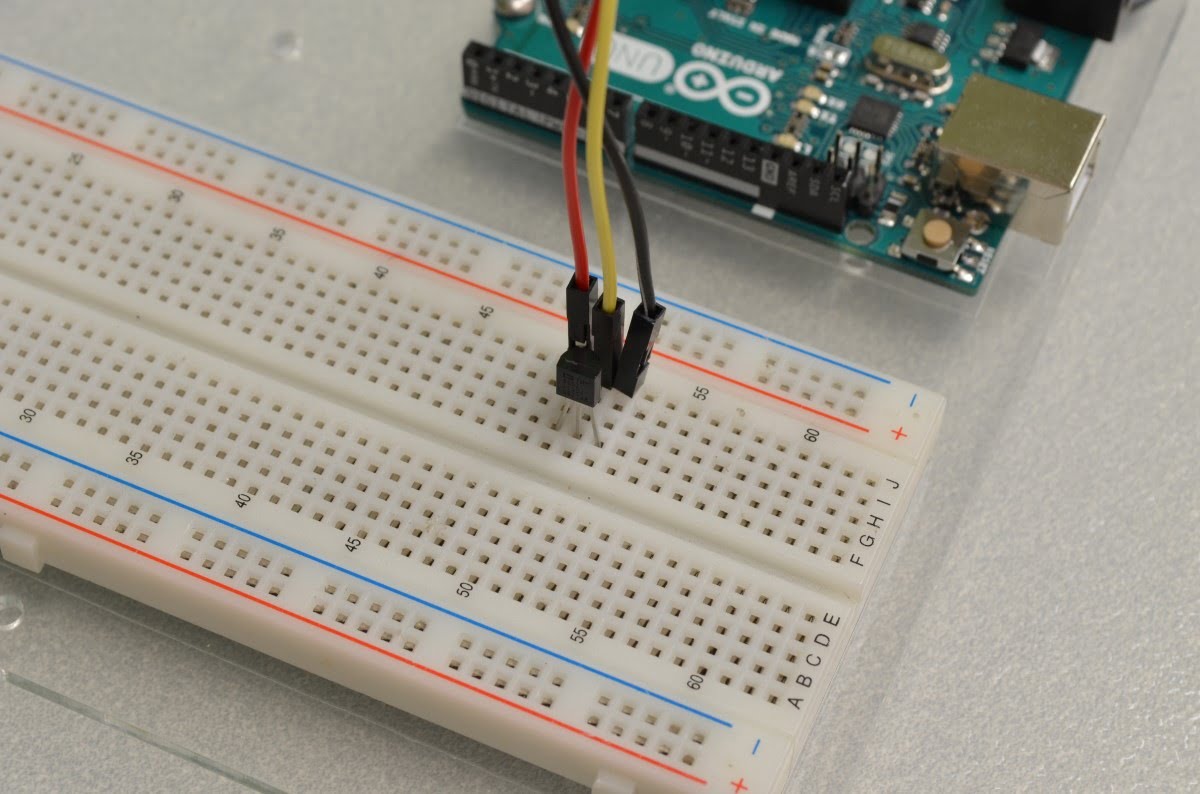
We are going to be using one of the Arduino’s analog input pins for this tutorial. Run a jumper wire from the sensor’s “pin 2” (the middle pin) to an analog input. We will be using analog input 0 in this tutorial.
37.5%
Step 4 – Double Check And Plug It In!
Before we give the Arduino power it is always a good idea to go over all of the connections to make sure there are no wires in the wrong spot – sometimes that can make for a very expensive mistake!

50%
Step 5 – Starting The Code
					void setup() {
// put your setup code here, to run once:
}
void loop() {
// put your main code here, to run repeatedly:
}
Now that we have finished with the hookup we need to start writing some code. We will be using the Arduino IDE, this is available from https://www.arduino.cc/en/Main/Software
We will start with the “BareMinimum” sketch found by clicking “File” and selecting Examples / Basic / BareMinimum. This sketch is a great starting point as it includes the Setup and Loop functions – we will write the rest!
62.5%
Step 6 – Understanding How To Read The Sensor
This sensor is very easy to read – the sensor does all of the hard work so all we have to do is read the output. Since the output voltage is an analog voltage proportional to the temperature we can do some very basic math to take the voltage and turn it into a number that makes more sense.
75%
Step 7 - Writing The Code
We are starting with the BareMinimum Sketch found in the IDE, it should look something like this:
					void setup() {
// put your setup code here, to run once:
}
void loop() {
// put your main code here, to run repeatedly:
}
So first we will need some variables to use:
					int sensePin = A0; //This is the Arduino Pin that will read the sensor output
int sensorInput; //The variable we will use to store the sensor input
double temp; //The variable we will use to store temperature in degrees.

void setup() {
// put your setup code here, to run once:
}
void loop() {
// put your main code here, to run repeatedly:
}
We plugged the sensor into analog input 0 so we will declare this as a variable – this will make it much easier to change in the future if we ever decide to change which pin the sensor is plugged into. We also need two variables for the data; 1 will store the initial input from the analog input, and the other will store the temperature once we have converted it to decimal degrees.
Arduino analog inputs do not need to be configured in the Setup loop, so we will just add some code for starting the serial connection we will use to output the data.
					int sensePin = A0; //This is the Arduino Pin that will read the sensor output
int sensorInput; //The variable we will use to store the sensor input
double temp; //The variable we will use to store temperature in degrees.

void setup() {
// put your setup code here, to run once:
Serial.begin(9600); //Start the Serial Port at 9600 baud (default)

}
void loop() {
// put your main code here, to run repeatedly:
}
Ok now we can read the sensor, this will be done in the loop.
					int sensePin = A0; //This is the Arduino Pin that will read the sensor output
int sensorInput; //The variable we will use to store the sensor input
double temp; //The variable we will use to store temperature in degrees.

void setup() {
// put your setup code here, to run once:
Serial.begin(9600); //Start the Serial Port at 9600 baud (default)

}
void loop() {
// put your main code here, to run repeatedly:
sensorInput = analogRead(A0); //read the analog sensor and store it
}
Reading analog inputs is very easy with the Arduino – just that one line of code!
Now we will use a little math to convert that data to something a little more familiar:
					int sensePin = A0; //This is the Arduino Pin that will read the sensor output
int sensorInput; //The variable we will use to store the sensor input
double temp; //The variable we will use to store temperature in degrees.

void setup() {
// put your setup code here, to run once:
Serial.begin(9600); //Start the Serial Port at 9600 baud (default)

}
void loop() {
// put your main code here, to run repeatedly:
sensorInput = analogRead(A0); //read the analog sensor and store it
temp = (double)sensorInput / 1024; //find percentage of input reading
temp = temp * 5; //multiply by 5V to get voltage
temp = temp – 0.5; //Subtract the offset
temp = temp * 100; //Convert to degrees

}
The analog input gives us a value between 0 and 1023, 0 being no voltage and 1023 being 5V. To figure out what this voltage converts to in degrees Celsius we will need to first find the percentage of 5V on the input. This can be done by dividing the sensorInput by 1024.
As we know from the datasheet, the sensor will output 0 – 1.75V over a range of 175 degrees (-50° to 125°) so that means every 0.01V equals 1 degree. We will need to convert the percentage of input to voltage by multiplying by 5V.
Since we are not measuring 0° – 175° we will need to shift the output value so that the minimum reading of -50° equals a voltage reading of 0. We do this by subtracting 0.5 from the output voltage. Our new value now ranges from -0.5 to 1.25 (which looks remarkably similar to our temperature range!)
To convert from millivolts to degrees Celsius we will need to multiply by 100.
Now that we have degrees, let’s output it via serial so it can be seen from the Arduino Serial Monitor.
					int sensePin = A0; //This is the Arduino Pin that will read the sensor output
int sensorInput; //The variable we will use to store the sensor input
double temp; //The variable we will use to store temperature in degrees.

void setup() {
// put your setup code here, to run once:
Serial.begin(9600); //Start the Serial Port at 9600 baud (default)

}
void loop() {
// put your main code here, to run repeatedly:
sensorInput = analogRead(A0); //read the analog sensor and store it
temp = (double)sensorInput / 1024; //find percentage of input reading
temp = temp * 5; //multiply by 5V to get voltage
temp = temp – 0.5; //Subtract the offset
temp = temp * 100; //Convert to degrees

Serial.print("Current Temperature: ");
Serial.println(temp);
}
That’s it – we are all done.
87.5%
Step 8 – Upload The Code And Test
Now that all of the code has been written it can be uploaded to your Arduino! Click “Upload” button in the top left corner of the Arduino IDE and it should upload without any issues. Next, click the “Serial Monitor” button in the top right corner (it looks like a magnifying glass). After a few seconds you should start to see a stream of data appear in the window – that is your temperature in degrees Celsius.

100%
33 thoughts on “Using A TMP36 Temperature Sensor With Arduino”
karthik
aurdino due convert voltage to temperature from ad8495 16bit and output 5mv/degree C. can anyone send me the code for this.
Tas
int sensePin = A0; //This is the Arduino Pin that will control Relay #1
I don’t think there is a relay on this project 😉
Chris @ BCR
Good Catch – Copy/Paste strikes again!
James Hudson
Thank you so very much for your excellent illustrations, the pictures are very clear with no “blurryness” I had no problem whatsoever understanding exactly how to use a TMP36 to work with an Ardunio using your MOST EXCELLENT diagrams. Thank you so very much for all the time you put into this.
MikeH
I am using a single Arduino board to hook up the temp sensor and a fan powered using a transistor from one of the digital I/Os. Whenever power is supplied to the fan, the temperature sensor sees a jump in temp (jump in voltage). Why is this occurring and how do I fix the problem? Thanks!
Sp.
Looks like the readings are quite arbitrary.. Does anyone have the same issue?
I found online that a resistor (41.7K) should be connected on the TMP36 analog output pin.
Any comments?
Thanks,
Sp.
Chris @ BCR
Personally – i wouldn’t rely on the TMP36 to be anything more than a rough approximation. It is an easy sensor for people to learn with but if you are concerned about what the temperature actually is, there are far better options. I am a fan of using thermistors and thermocouples – all of these IC based temp sensors tend to read warm due to the internal heating of the onboard circuitry.
Lucas
HI! I’m having problems every time i run the program it comes up with minus temperatures plz help.
Anonymous
I have the same problem
Chris @ BCR
Likely this is due to the sensor not being connected correctly or not functioning correctly. Your default value if the sensor is unplugged will be -50. Double check the connections and try another sensor if you can.
Anonymous
int sensePin = A0;
int sensorInput;
double temp;
void setup() {
Serial.begin(9600);
}
void loop() {
sensorInput = analogRead(A0);
temp = (double)sensorInput / 1024;
temp = temp * 5;
temp = temp – 0.5;
temp = temp * 100;
Serial.print(“Current Temperature: “);
Serial.println(temp);
if(temp > 15){
digitalWrite(2, LOW);
}
if(temp < 15){
digitalWrite(2, HIGH);
}
}
I'm trying to make a motor turn when it is over a certain temperature for a fan but i cant get it to work
Deepak Rajendra Waghmare
can we connect the sensor output to the input of digital pin instead analog
mike87
no… they are analog sensors
Skelder
I’m working with a TMP with a range of -40 to 125. How do i find a new number to divide by instead of the 1024
Jessica
1024 stays the same change this line:
temp = temp – 0.5; //Subtract the offset
to
temp = temp – 0.4; //Subtract the offset
Carl Summers
When I ran it for the first time, I get approximately the correct temperature, but as I continued using an Uno with the sensor, the TMP36 started reading excessively high temperatures into 100 before the board itself shut off and could not be used for several hours. Would you recommend using something like a capacitor to prevent this from occurring? And if so, where does the capacitor fit on the circuit?
Halley Ganado
If for example the sensor reached a temperature of 50 degrees celcius, can we use the code made from the sensor to make a motor spin?
Serega74
Found this piece if code to work much better:
tempAve=0;
for(int i = 0; i < 1000; i++){
sensorInput = analogRead(A0); //read the analog sensor and store it
temp = (double)sensorInput / 1024; //find percentage of input reading
temp = temp * 5; //multiply by 5V to get voltage
temp = temp – 0.5; //Subtract the offset
temp = temp * 100; //Convert to degrees
tempAve=tempAve+temp;
}
tempAve=tempAve / 1000;
// Print result
Serial.print("Current Temperature: ");
Serial.println(tempAve); //in again
mike87
yikes that is bad – so if the average temperature reading exceeds about (+/-)32.7 Celsius your code freezes
David
It would be better to compute a running average to avoid the overflow.
GioWisely
temp variable is repeated, logic will get confuse. I’m not a pro, please comment on this tweaks.
#define buzzer 2
int sensePin=A0;
int sensorInput;
double temp;
int tempvoltage;
int temppercent;
int tempcelcius;
void setup() {
Serial.begin(9600);
pinMode (buzzer, OUTPUT);
}
void loop() {
sensorInput=analogRead(A0);
temp=sensorInput/1024;
tempvoltage=temp*5;
temppercent=tempvoltage*0.95;
tempcelcius=temppercent*100;
if (tempcelcius>37.5){
digitalWrite(buzzer, HIGH);
}
else{
digitalWrite(buzzer, LOW);
}
}
Chris @ BCR
The variable temp is simply being reused. Everything on the right side of the equal sign is done first, and then the variable “temp” is made to equal those results and carried to the next operation. Saves declaring a bunch of variables for one time use.
afggfhghn
your if statements are wrong
unknown
how is the value from sensor lies between 20 to 358
what are these values?
a
I don’t know if you’ve figured this out by now, but your “if” statement is backwards. I assume you want the fan to come on above 15c. It should be like this:
if(temp > 15){
digitalWrite(2, HIGH);
} else {
digitalWrite(2, LOW);
}
Jacker
In all the data sheets for the TMP36 it says -40 C to 125 C. So yes, the subtraction I think should be temp = temp -0.4, instead of as shown here as temp = temp – 0.5.
But there is another thing. The data sheet seems to me to be contradictory, but when you look at the charts section it looks like at -40 degrees C the voltage is NOT 0, it is (hard to see because it is not enough resolution but approx.) 150mV. At -40 C.
So don’t we have to adjust for that too, as 150mV is the base voltage…lowest.
.?
Chris @ BCR
We aren’t subtracting the negative portion of the temperature range here, we are subtracting the offset between the calibrated voltage vs the calibrated temperature.
– We know it is 10mV / degree and the sensor has a max reading of 1.75V
– We also know that it is corrected to 750mV (0.75V) = 25 degrees Celsius (per the datasheet) 0.01 * 25 = 0.25 , 0.75 – 0.25 = 0.5
So the offset is 0.5V (or 50 degrees) so you would take your voltage reading and subtract 0.5V to align it to the calibrated point of 0.75V = 25 degrees Celsius.
Chris @ BCR
No worries! The TMP36 is an old sensor – very old by electronics standards so there have been several iterations and different manufacturers, so things have changed over the years. Early on when the tutorial for the TMP36 was written, we had a -50 to 125C TMP36 , which worked (though it never seemed to be able to reach 0V/-50 due to its internal heating). Fortunately, in each version of the chip since, they never deviated from the 0.75V = 25C, and the equation has always stayed the same (though I guess we should go back and update the logic a bit)
A note about measuring temperature: As you approach the limits on each end of the range you also tend to reach the maximums of the +/- accuracy and self heating bias – which can be up to +/-5 degrees with this sensor so any slight variation on their graphs could be a reflection of that as well. There isn’t a temperature sensor out there in this price range that isn’t going to need a significant level of calibration if you want to get that accuracy across the entire range – so take the information they give you in the datasheets and the readings from any temperature sensor with a grain of salt. This method we use is really just a quick and dirty way of grabbing the temperature – any reasonable need for accuracy should look at a different sensor or a much more complex, calibrated, method of correcting the input.
Regarding the 3.3V aspect: correct, but also also double check it has the same bit-depth ADC as the Uno. If it is not 10 bit (0-1023), you will have to change “1024” to match the bit depth of whatever the board you are using.
Hopefully that helps!
ayush
when i m using this code the temp is showing to be 444 and above Celsius and actual temp doesnt even cross 40 here so what is wrong or whats the logic with that ???
haylee
how much does the tmp36 weigh
Chris @ BCR
The sensor weighs approximately 0.2 grams
simon
hello,
at first thanks for the code, saves me a lot of time.
but i do have a problem.
i used my arduino on 3.3 volts so i changed it in the code to 3.3 volts, but all the numbers i get are in the 60.
is this normal?
can u help me?
greetings
Simon
nc
so i dont know what i did wrong
// set up led pins
int PIN_RED = 9;
int PIN_GREEN = 10;
int PIN_BLUE = 11;
//set up sensor
int sensePin = A0;
int sensorInput;
double temp;
void setup() {
pinMode(PIN_RED, OUTPUT);
pinMode(PIN_GREEN, OUTPUT);
pinMode(PIN_BLUE, OUTPUT);
Serial.begin(9600);
}
void loop () {
//read the analog sensor
sensorInput = analogRead(A0);
temp = (double)sensorInput / 1024;
temp = temp * 5;
temp = temp – 0.5;
temp = temp * 100;
Serial.print(“Current Temperature: “);
Serial.println(temp);
if (temp <= 42) {
for (int i = 1; i < 2; i++) {
cold ();
off ();
}
} else if (temp <= 84) {
for (int i = 1; i = 85) {
for (int i = 1; i < 7; i++) {
hot ();
off ();
}
}
}
void cold (){
analogWrite(PIN_RED, 0);
analogWrite(PIN_GREEN, 255);
analogWrite(PIN_BLUE, 255);
delay (48)
}
void norm (){
analogWrite(PIN_RED, 0);
analogWrite(PIN_GREEN, 255);
analogWrite(PIN_BLUE, 0);
delay (48)
}
void hot (){
analogWrite(PIN_RED, 255);
analogWrite(PIN_GREEN, 48);
analogWrite(PIN_BLUE, 0);
delay (48)
}
void off () {
analogWrite(PIN_RED, 0);
analogWrite(PIN_GREEN, 0);
analogWrite(PIN_BLUE, 0);
delay (15)
}